AGIC and AKS with Kubenet - Part 1
In this multipart article, we will come back on Application Gateway as Ingress Controller and its configuration and usage specifically in an AKS / Kubenet environment.
This is the result of a series of talks that I had the opportunity to do last year, so now comes the time for a written summary ^^
I hope you’ll enjoy it.
Table of content
- AGIC TL;DR
- Review AKS kubenet model
- Installing AGIC the easy way, and looking what’s done behind the scene
- What you should keep from this
1. AGIC TL;DR
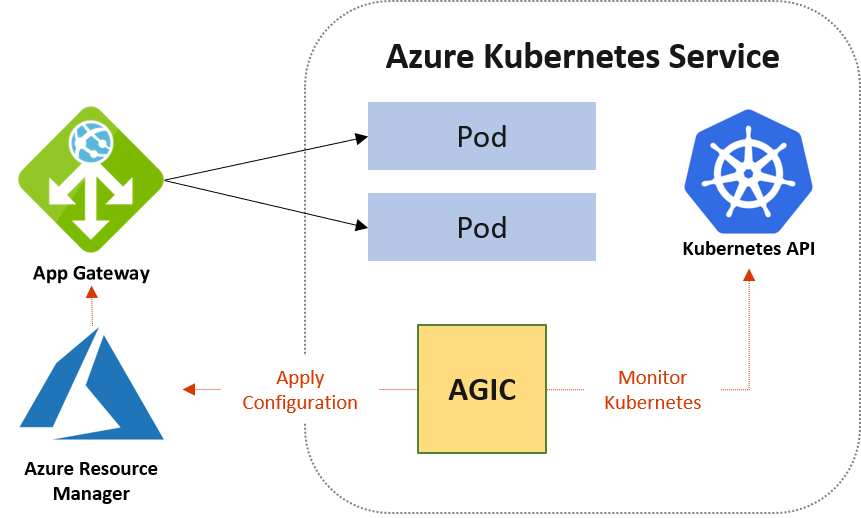
Before going in depth about Application Gateway as an Ingress Controller (referred as AGIC in the document), let’s have a tl;dr description ^^
AGIC is a way to provide an Ingress Controller in AKS, meaning in the Kubernetes control plane, based on the Application Gateway that lives in Azure control plane. That’s a kind of recurring thing with AKS and its integration with the Azure platform, having things living in both control planes and gain Cloud managed feature, which is fine. One obvious advantage is that since the control plane of Application Gateway lives in Azure, it does not require Kubernetes Ops to manage everything such as WAF policies.
Apart from that, AGIC comes with nearly every features that Application Gateway can bring to the table such as TLS Certificate integration with Key Vault, or using Internet facing and internal interface for different type of traffic, or… well, let’s refer to the documentation for that if you will ^^
Now there is also another thing to remember. AGIC comes in two flavour, an OSS project, and an add-on that can be directly enabled in AKS:
| Add-on | Open Source Project |
|---|---|
| Simply add the feature through az cli or other API interaction | Get more control on the deployments and features |
| Benefit from Microsoft support, since the add-on is managed | Use a community proven tool for deployments such as Helm and have more control on configuration, such as log verbosity… |
And that’s about all, as I said, a tl;dr, we don’t want to copy paste the documentation, which is quite good. About that, when I mention documentation, I mean the OSS documentation in github.
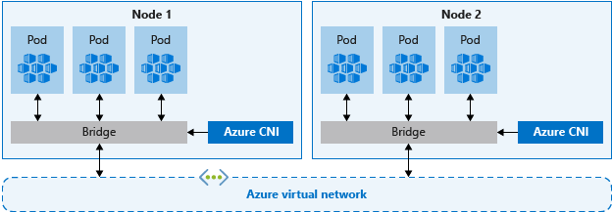
2. Review AKS Kubenet model
Before going in the first way of installing AGIC, we need to review the available networking models in AKS. Because we will focus on one of those models and some of the impact that it can have. So let’s get going.
To summarize the 2 networking models let’s put that into a table:
| Azure CNI | Kubenet |
|---|---|
| Rich integration with Azure VNet | Less integrated so less features (but a tendency to get more) |
| Every object consume IP in the VNet range, nodes AND pods | Only nodes consume IP from the VNet range |
Thanks to Azure documentation, we can have nice schemas explaining the difference:
- Azure CNI creates a kind of bridge between the pod and the Azure Network layer
- Kubenet acts as an NAT and Network flow is routed between the Azure VNet and the Pods IP range.
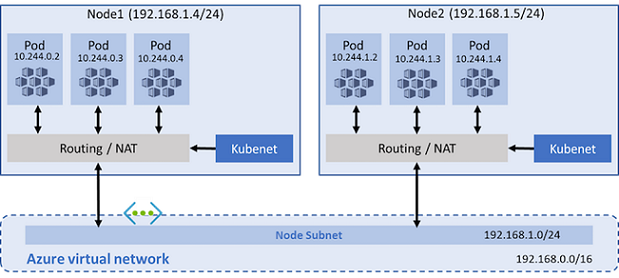
Typically, Kubenet comes on the table because:
- It isolates pod addressing from the VNet Range.
- It avoids claiming huge RFC 1918 range for AKS, which may not be available, due to existing networks.
- Pods are reachable from the outside only through exposed Kubernetes services.
Let’s also keep in mind that:
- It is limited to Linux nodes
- Due to the isolation, an UDR is required
- Even if the Pod range is isolated, by default, 3 big IP ranges are consumed and should not be consumed elsewhere in the connected Network space (apart on other AKS Kubenet clusters).
The table below summarizes the IP range required by a Kubenet AKS cluster:
| CIDR to be cautious of | Default value |
|---|---|
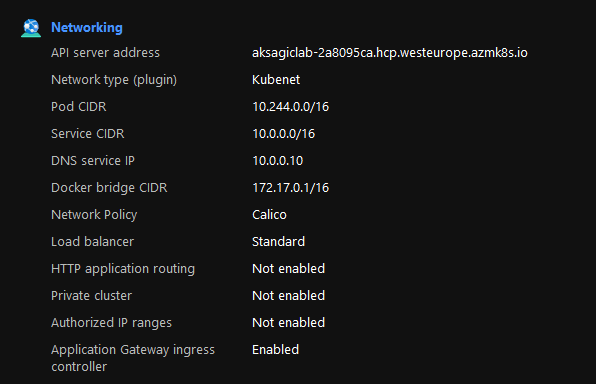
The --service-cidr is used to assign internal services in the AKS cluster as IP addresses. |
10.0.0.0/16 |
The --pod-cidr should be a large address space that isn’t in use elsewhere in your network environment. |
10.244.0.0/16 |
The --docker-bridge-address lets the AKS nodes communicate with the underlying management platform. |
172.17.0.1/16 |
The UDR is managed by the Kubernetes cluster, it dynamically adds routes for the nodes following scaling actions.
About that, each node is assigned a CIDR of /24 in the service CIDR subnet, and there is a hard limit of 400 nodes due to the limit of 400 routes in an UDR.
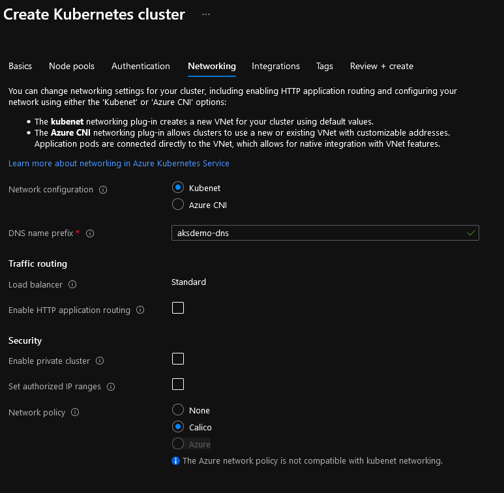
Last, someone using the portal to deploy a Kubernetes cluster may be surprised by the difference of options depending on the chosen networking model.
With Kubenet, also called basic mode, there is no possibility to deploy in an existing Virtual Network.
More options are available when choosing Azure CNI:
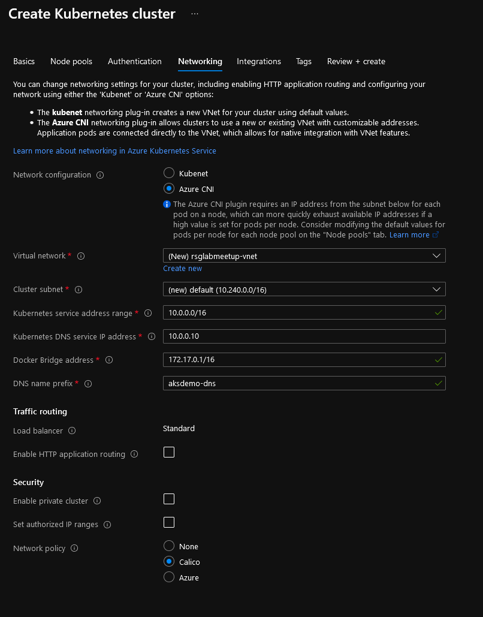
That being said, it does imply that the method of deployment should involve either a CLI or an IaC tool, which is fine by me ^^.
Ok that’ enough for this networking reminder, which was quite long. Let’s have some fun and let’s look at the installation of the add-on.
3. Installing AGIC the easy way, and looking what’s done behind the scene
3.1. Install
AS mentioned earlier, we can benefit from AGIC through an add-on.
This is quite easy to activate then, through a simple az cli command which would look like that:
- First we get the Application Gateway Resource ID:
$agwid = (az network application-gateway show -n agw-1 -g rsgagicmeetup -o tsv --query id)
- Second, we activate the add-on
az aks enable-addons -n aks-agic -g rsgagicmeetup -a ingress-appgw --appgw-id $agwid
 AAD role propagation done[############################################]  100.0000%{
  "aadProfile": {…},
  "addonProfiles": {
==============================Truncated==================================
    "ingressApplicationGateway": {
      "config": {
        "applicationGatewayId": "/subscriptions/xxxxxxxx-xxxx-xxxx-xxxx-xxxxxxxxxxxx/…",
        "effectiveApplicationGatewayId": "/subscriptions/xxxxxxxx-xxxx-xxxx-xxxx-xxxxxxxxxxxx/…"
      },
      "enabled": true,
      "identity": {
        "clientId": "xxxxxxxx-xxxx-xxxx-xxxx-xxxxxxxxxxxx",
        "objectId": "xxxxxxxx-xxxx-xxxx-xxxx-xxxxxxxxxxxx",
        "resourceId": "/subscriptions/xxxxxxxx-xxxx-xxxx-xxxx-xxxxxxxxxxxx/…
      }
    },
==============================Truncated====================================
 }
After this command, the installation would be complete and we could start using the Ingress Controller. I prepared a testing environment, using Terraform,a null resource and a provisioner to configure my addon, as displayed below:
resource "null_resource" "Install_AGIC_Addon" {
  #Use this resource to install AGI on CLI
  #count = local.agicaddonstatus == "false" ? 1 : 0
  provisioner "local-exec" {
    command = "az aks enable-addons -n ${data.azurerm_kubernetes_cluster.AKSCluster.name} -g ${data.azurerm_resource_group.AKSRG.name} -a ingress-appgw --appgw-id ${data.azurerm_application_gateway.AGW.id}"
  }

  depends_on = [

  ]
}
Btw, my config is available on github.
Let’s now look at what happened.
3.2. What’s happening under the hood
So, as mentioned, we now want to see what really happened behind the scene.
First thing, we may go to the portal to see what was done. Or we could also use an az cli command just like that:
az aks show -n aks-1 -g rsgagicmeetup1 --query addonProfiles.ingressApplicationGateway
Before the add-on installation, we would have the output below:
{
  "config": null,
  "enabled": false,
  "identity": null
}
Now, after the installation we get something like that:
{
  "config": {
    "applicationGatewayId": "/subscriptions/00000000-0000-0000-0000-000000000000/resourceGroups/rsgagicmeetup1/providers/Microsoft.Network/applicationGateways/agwagicmeetup1",
    "effectiveApplicationGatewayId": "/subscriptions/00000000-0000-0000-0000-000000000000/resourceGroups/rsgagicmeetup1/providers/Microsoft.Network/applicationGateways/agwagicmeetup1"
  },
  "enabled": true,
  "identity": {
    "clientId": "00000000-0000-0000-0000-000000000000",
    "objectId": "00000000-0000-0000-0000-000000000000",
    "resourceId": "/subscriptions/00000000-0000-0000-0000-000000000000/resourcegroups/rsg-dfitcfr-lab-agic-aksobjects1/providers/Microsoft.ManagedIdentity/userAssignedIdentities/ingressapplicationgateway-aks-1"
  }
}
A peek in the portal shows that the Ingress is indeed activated:
That’s one part.
Now let’s focus on the identity part.
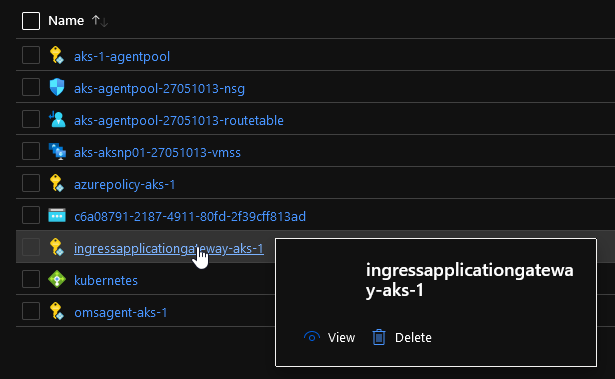
You may have noticed that the az cli query gives us information on an identity. There is indeed the creation of an User Assigned Managed Identity, that we can find in the portal:
This identity is assigned RBAC roles on both resource groups containing the AKS Cluster object and the backend related AKS objects:
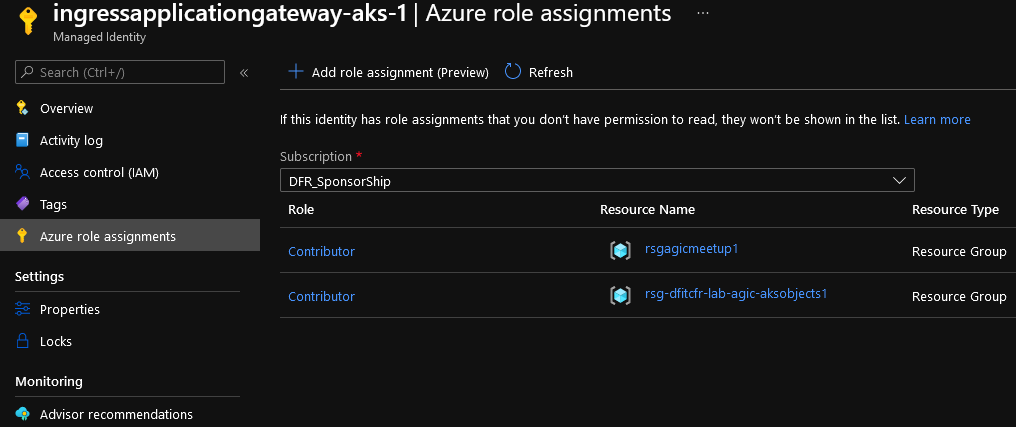
Those roles will allows AKS and its Ingress Controller extension to manipulate the Application Gateway when needed.
This is the assignment done by the add-on installation, but it is also possible to scope the Contributor role to the Application Gateway only. In this case it is required to add assign Reader role on the Resource Group containing the Application Gateway. More details available on the AGIC documentation.
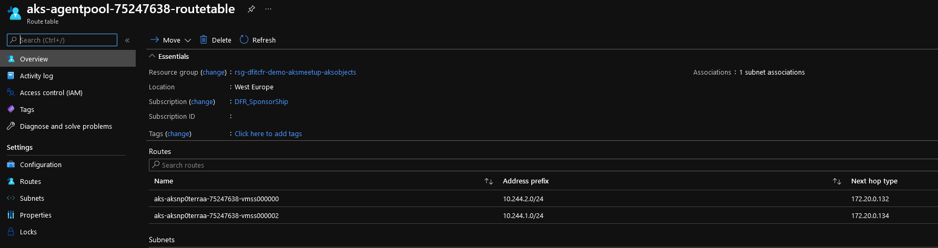
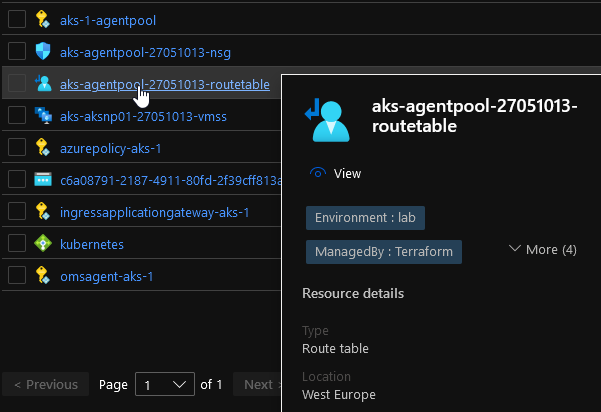
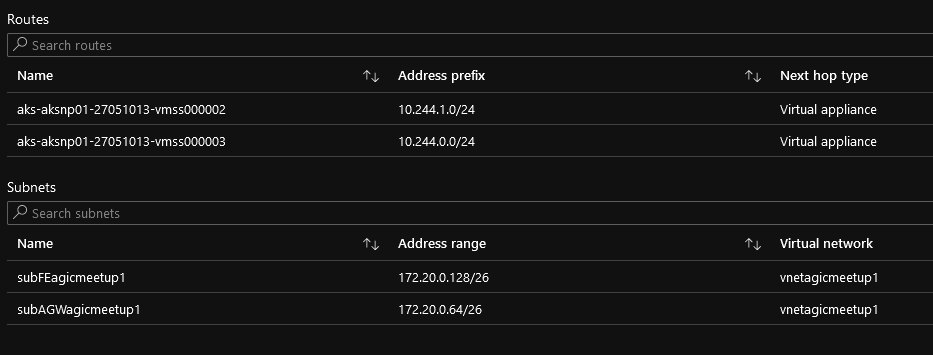
And last, since we are using Kubenet, you may remember that an UDR is created at the AKS cluster provisioning time. This UDR is in the Resource Group containing all the AKS resources and is associated by default with the subnet in which the nodes reside.
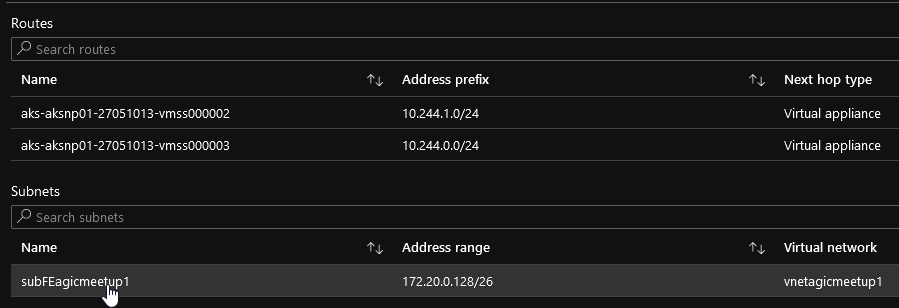
Since the Application Gateway lives in an Azure Virtual Network and has no clue on how to reach the pods, we need to have the same association on the Application Gateway subnet, which is done at the add-on installation:
With that, we have seen all the visible things on the Azure control plane. We could also explore the Kubernetes objects, but we’ll keep that for another day.
4. What you should keep from this
It’s time to wrap up, at least for this part.
So if we want to summarize, let’s remember that
- Kubenet brings specific network design watch points on its own
- It also brings an additional routing configuration when coupled with AGIC
- AGIC can be easily installed through an add-on
- This add-on is doing things behind the scene, on the RBAC assignments and the mentioned routing configuration
And that’s all.
Next, we will look into the custom installation with Helm and benefits from what we learned in this part for the configuration.
See you ^^