Cluster mesh with Cilium in AKS
Hi there!
Last time, we discussed a bit about Cilium in an AKS environment. But we let it at a point on which, well, we are far from having a complete picture. So in this article, I propose that we have a look at Cilium cluster Mesh featuer and see how it works and what it brings.
Our agenda will be as follow
- Cluster Mesh concepts
- Preparing the lab
- Testing cluster mesh
Let’s get started!
1. Cluster Mesh concepts
So what do we talk about here? AS the name implies, we want to achieve a mesh between clusters so that we can get a global view of the hosted workload on our meshed clusters. Note by the way that there is an excellent blog article written on Cilium blog that explain all of this.

Use cases could be:
- High availability
- Shared services
- Splitting services by kind
That seems nice.
Features listed as available in the cluster mesh pattern are
- Pod Ip routing accross clusters.
- Transparent service discovery.
- Network policies spanning multiple clusters.
- Transparent encryption also accross cluster.
If we want to try this out, we need to not at least the following prerequisites:
- Cluster worker nodes should have connectivity between clusters.
- Pod Cidr cannot overlap between clusters.
Now, considering Cilium, it’s also important to note the available option for routing.
This will be important because we want to enable communication between pods accross clusters.
How one pod find a route to another is important.
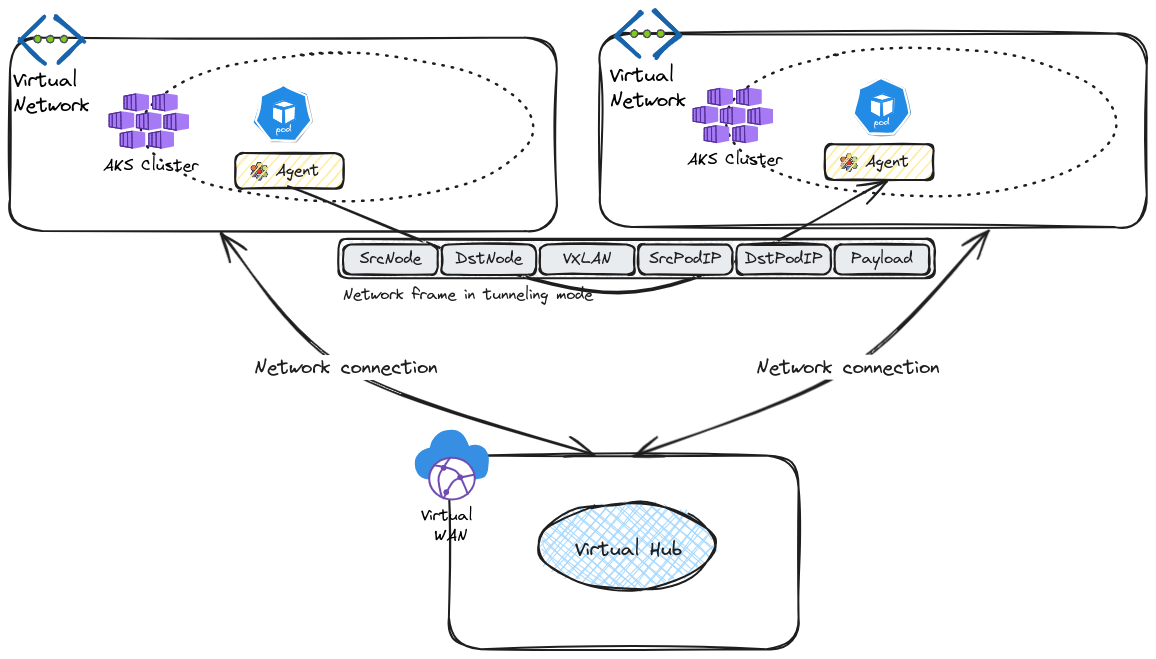
The default configuration uses encapsulation. As described in Cilium documentation, all cluster nodes form a mesh of tunnel using UDP-based encapsulation. That’s probably one of the firewall configuration that we may need:
| Encapsulation Mode | Port Range / Protocol |
|---|---|
| VXLAN (Default) | 8472/UDP |
| Geneve | 6081/UDP |
The main advantage of this configuration is the simplicity (which is probably why this is the default mode), and the main limitation is the impact on the MTU overhead. We’ll note that while this can easily be mitigated in a standard network, it’s a little bit more tricky in Azure. Indeed, the default MTU is 1500, and the modification, if done, should be done on the NIC level. If we’re talking about AKS clusters, which nodes are Virtual machine scale sets managed on the Kubernetes plane, we would have to modify the MTU properties throuhg some command line each time a new node was provisioned.
Another routing mode available is the native routing. In this configuration, to be clear, the network of the nodes needs to be able to route the network of the pods. Which is similar to not have an overlay. If it worked on an Azure environment, it would also imply that the network planning should be done in a similar way to the planning for Azure CNI (without overlay).
Other configuration are listed in the documentation, but those are more cloud platform specific.
The helm chart parameter for the routing configuration is routingMode with a default value to tunnel
That would be all for our view around the concepts. Let’s play a bit now.
2. Preparing the lab
We want to try cluster mesh in an Azure environment, meaning with AKS clusters.
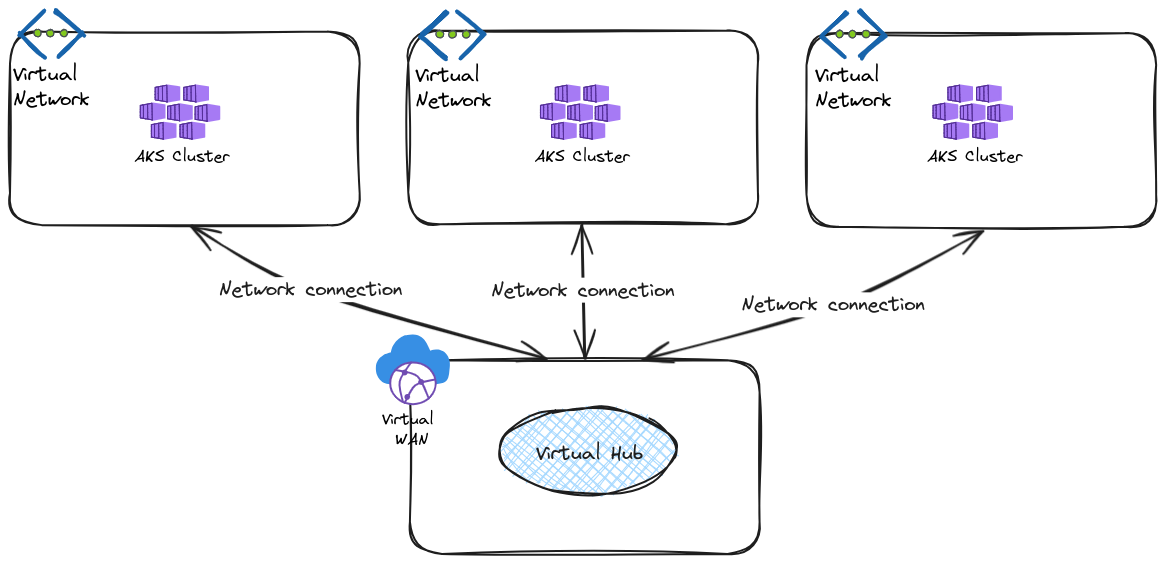
Also, to put some perspective in usual network topology, we’ll use Azure virtual network connected together through a virtual Hub. For now, we won’t add any firewall in the hub, but we may come to that later.
The required Azure resources for this lab are
| Name | Description |
|---|---|
| azurerm_virtual_network | Virtual network for AKS clusters |
| azurerm_subnet | Subnets for AKS clusters |
| azurerm_kubernetes_cluster | AKS clusters to be meshed |
| azurerm_virtual_hub_connection | Network connection on a virtual hub to |
| azurerm_virtual_hub | A virtual hub to allow connectivity between spokes |
| azurerm_virtual_wan | A virtual WAN containing the virtual hub |
Once we have our clusters, we need to install cilium, because those are byocni clusters. We also want to disable kube-proxy. This way, we’ll be able to manage more functionnalities of Cilium.
To manage kube-proxy, we can refer to the Azure documentation. We can use the az aks update command as below:
az aks update --resource-group <resourceGroup> --name <clusterName> --kube-proxy-config kube-proxy.json
The kube-proxy.json file is the repository for the kube-proxy configuration. In our case, we simply want this configuration to disable kube-proxy, so the file would look like this:
{
    "enabled": false,
}
Since the cluster can be updated in place, we can use an az api update resource:
resource "azapi_update_resource" "kube_proxy_disabled" {
  resource_id = <AksClusterId>
  type        = "Microsoft.ContainerService/managedClusters@2024-02-02-preview"
  body = jsonencode({
    properties = {
      networkProfile = {
        kubeProxyConfig = {
          enabled = false
        }
      }
    }
  })
}
As mentionned, Cilium need to be installed, the required arguments in our case would be as below:
{
  "set1": {
    "name": "hubble.relay.enabled",
    "value": true
  },
  "set2": {
    "name": "hubble.ui.enabled",
    "value": true
  },
  "set3": {
    "name": "aksbyocni.enabled",
    "value": true
    },
  "set4": {
    "name": "nodeinit.enabled",
    "value": true
  },
  "set5": {
    "name": "k8sServiceHost",
    "value": "<aksfqdn>"
  },
  "set6": {
    "name": "kubeProxyReplacement",
    "value": "true"
  },
  "set7": {
    "name": "k8sServicePort",
    "value": "443"
  },
  "set8": {
    "name": "ipam.operator.clusterPoolIPv4PodCIDRList",
    "value": "{podcidr}"
  },
  "set9": {
    "name": "cluster.id",
    "value": "1"
  },
  "set10": {
    "name": "cluster.name",
    "value": "cluster1"
  },
  "set11": {
    "name": "azure.resourceGroup",
    "value": "<AKSRG>"
  }
}
The four first argument are basic cilium configuration. Those needed for the cluster mesh are the argument 8 to 11. In between, the argument 5 to 7 are set to configure the kube-proxy replacement.
The ipam.operator.clusterPoolIPv4PodCIDRList allows to change the default value for the pod cidr. We match the value here to the value specified on the AKS cluster for the pod cidr.
The arguments cluster.name and cluster.id are both required for the cluster mesh configuration.
The azure.resourceGroup is the resource group in which the AKS cluster (not its associated resources) lives.
With Cilium installed on each clusters, we can now check the status with the cilium status command.
azureuser@vm1:~$ cilium status --wait
    /¯¯\
 /¯¯\__/¯¯\    Cilium:             OK
 \__/¯¯\__/    Operator:           OK
 /¯¯\__/¯¯\    Envoy DaemonSet:    disabled (using embedded mode)
 \__/¯¯\__/    Hubble Relay:       OK
    \__/       ClusterMesh:        OK

Deployment             cilium-operator          Desired: 2, Ready: 2/2, Available: 2/2
Deployment             hubble-relay             Desired: 1, Ready: 1/1, Available: 1/1
Deployment             hubble-ui                Desired: 1, Ready: 1/1, Available: 1/1
DaemonSet              cilium                   Desired: 4, Ready: 4/4, Available: 4/4
Deployment             clustermesh-apiserver    Desired: 1, Ready: 1/1, Available: 1/1
Containers:            cilium                   Running: 4
                       cilium-operator          Running: 2
                       hubble-relay             Running: 1
                       clustermesh-apiserver    Running: 1
                       hubble-ui                Running: 1
Cluster Pods:          28/28 managed by Cilium
Helm chart version:
Image versions         cilium-operator          quay.io/cilium/operator-generic:v1.15.5@sha256:f5d3d19754074ca052be6aac5d1ffb1de1eb5f2d947222b5f10f6d97ad4383e8: 2
                       hubble-relay             quay.io/cilium/hubble-relay:v1.15.5@sha256:1d24b24e3477ccf9b5ad081827db635419c136a2bd84a3e60f37b26a38dd0781: 1
                       clustermesh-apiserver    quay.io/cilium/clustermesh-apiserver:v1.15.5@sha256:914549caf4376a844b5e7696019182dd2a655b89d6a3cad10f9d0f9821759fd7: 2
                       hubble-ui                quay.io/cilium/hubble-ui:v0.13.0@sha256:7d663dc16538dd6e29061abd1047013a645e6e69c115e008bee9ea9fef9a6666: 1
                       hubble-ui                quay.io/cilium/hubble-ui-backend:v0.13.0@sha256:1e7657d997c5a48253bb8dc91ecee75b63018d16ff5e5797e5af367336bc8803: 1
                       cilium                   quay.io/cilium/cilium:v1.15.5@sha256:4ce1666a73815101ec9a4d360af6c5b7f1193ab00d89b7124f8505dee147ca40: 4
There is a note about the Certificate Authority in the cluster mesh configiguration documentation.
We need to propagate the certificate accross the clusters. So as explained, we have to remove Cilium secret for the CA in all but one of our clusters and delete it:
kubectl -delete secret -n kube-system cilium-ca -o yaml --context <clustername>
And then propagate the secret
kubectl --context=$CLUSTER1 get secret -n kube-system cilium-ca -o yaml | \
  kubectl --context $CLUSTER2 create -f -
Next we can activate the mesh:
azureuser@vm1:~$ cilium clustermesh enable
🔮 Auto-exposing service within Azure VPC (service.beta.kubernetes.io/azure-load-balancer-internal)
Checking the cluster, we can find a service for the cluster mesh, as expected after the previous command:
azureuser@vm1:~$ k get svc -n kube-system
NAME                               TYPE           CLUSTER-IP       EXTERNAL-IP   PORT(S)             AGE
azure-policy-webhook-service       ClusterIP      100.69.107.195   <none>        443/TCP             42m
azure-wi-webhook-webhook-service   ClusterIP      100.69.105.29    <none>        443/TCP             25m
clustermesh-apiserver              LoadBalancer   100.69.180.158   172.21.12.8   2379:31406/TCP      76s
clustermesh-apiserver-metrics      ClusterIP      None             <none>        9962/TCP,9963/TCP   76s
hubble-peer                        ClusterIP      100.69.12.9      <none>        443/TCP             22m
hubble-relay                       ClusterIP      100.69.2.96      <none>        80/TCP              22m
hubble-ui                          ClusterIP      100.69.158.3     <none>        80/TCP              22m
kube-dns                           ClusterIP      100.69.0.10      <none>        53/UDP,53/TCP       42m
metrics-server                     ClusterIP      100.69.196.87    <none>        443/TCP             42m
If we check in the AKS managed resource group, we will find an internal load balancer which IP match the external IP of the cilium clustermesh-apiserver service.
azureuser@vm1:~$ az network lb show -n kubernetes-internal -g rsg-aksobjectsciliumlab3 | jq . | grep -i privateIPAddress
      "privateIPAddress": "172.21.12.8",
      "privateIPAddressVersion": "IPv4",
With the cilium status and cilium clustermesh status command, we should have a display similar to this now:
azureuser@vm1:~$ cilium status
    /¯¯\
 /¯¯\__/¯¯\    Cilium:             OK
 \__/¯¯\__/    Operator:           OK
 /¯¯\__/¯¯\    Envoy DaemonSet:    disabled (using embedded mode)
 \__/¯¯\__/    Hubble Relay:       OK
    \__/       ClusterMesh:        OK

DaemonSet              cilium                   Desired: 3, Ready: 3/3, Available: 3/3
Deployment             clustermesh-apiserver    Desired: 1, Ready: 1/1, Available: 1/1
Deployment             cilium-operator          Desired: 2, Ready: 2/2, Available: 2/2
Deployment             hubble-ui                Desired: 1, Ready: 1/1, Available: 1/1
Deployment             hubble-relay             Desired: 1, Ready: 1/1, Available: 1/1
Containers:            cilium                   Running: 3
                       cilium-operator          Running: 2
                       hubble-ui                Running: 1
                       clustermesh-apiserver    Running: 1
                       hubble-relay             Running: 1
Cluster Pods:          39/39 managed by Cilium
Helm chart version:    1.15.5
Image versions         hubble-ui                quay.io/cilium/hubble-ui-backend:v0.13.0@sha256:1e7657d997c5a48253bb8dc91ecee75b63018d16ff5e5797e5af367336bc8803: 1
                       hubble-ui                quay.io/cilium/hubble-ui:v0.13.0@sha256:7d663dc16538dd6e29061abd1047013a645e6e69c115e008bee9ea9fef9a6666: 1
                       clustermesh-apiserver    quay.io/cilium/clustermesh-apiserver:v1.15.5@sha256:914549caf4376a844b5e7696019182dd2a655b89d6a3cad10f9d0f9821759fd7: 2
                       hubble-relay             quay.io/cilium/hubble-relay:v1.15.5@sha256:1d24b24e3477ccf9b5ad081827db635419c136a2bd84a3e60f37b26a38dd0781: 1
                       cilium                   quay.io/cilium/cilium:v1.15.5@sha256:4ce1666a73815101ec9a4d360af6c5b7f1193ab00d89b7124f8505dee147ca40: 3
                       cilium-operator          quay.io/cilium/operator-generic:v1.15.5@sha256:f5d3d19754074ca052be6aac5d1ffb1de1eb5f2d947222b5f10f6d97ad4383e8: 2
azureuser@vm1:~$ cilium clustermesh status
✅ Service "clustermesh-apiserver" of type "LoadBalancer" found
✅ Cluster access information is available:
  - 172.21.12.8:2379
✅ Deployment clustermesh-apiserver is ready
🔌 No cluster connected
🔀 Global services: [ min:-1 / avg:0.0 / max:0 ]
Now all we have to do is to connect the clusters together with the cilium clustermesh connect command. We have to specify the target cluster with the argument --destination-context.
azureuser@vm1:~$ cilium clustermesh connect --destination-context aks-ciliumlab2
✅ Detected Helm release with Cilium version 1.15.5
✨ Extracting access information of cluster cluster2...
🔑 Extracting secrets from cluster cluster2...
ℹ️  Found ClusterMesh service IPs: [172.21.11.7]
✨ Extracting access information of cluster cluster1...
🔑 Extracting secrets from cluster cluster1...
ℹ️  Found ClusterMesh service IPs: [172.21.10.7]
ℹ️ Configuring Cilium in cluster 'aks-ciliumlab' to connect to cluster 'aks-ciliumlab2'
ℹ️ Configuring Cilium in cluster 'aks-ciliumlab2' to connect to cluster 'aks-ciliumlab'
✅ Connected cluster aks-ciliumlab and aks-ciliumlab2!
The mesh is establish in both ways, under the condition that we have access to both context. Repeting that on our other clusters, we get a 3 clusters mesh. We can now test the mesh funtionnalities
3. Testing cluster mesh
The first thing we want to test is the service discovery accross the clusters. For that we will create a bunch of application. For the purpose of not doing exactly the same way as in the cilium tutorials, let’s create an deployment based on an AKS demo app on each cluster.
apiVersion: apps/v1
kind: Deployment
metadata:
name: aks-helloworld-one
namespace: meshtest
spec:
replicas: 1
selector:
matchLabels:
app: aks-helloworld-one
template:
metadata:
labels:
app: aks-helloworld-one
spec:
containers:
- name: aks-helloworld
image: mcr.microsoft.com/azuredocs/aks-helloworld:v1
ports:
- containerPort: 80
env:
- name: TITLE
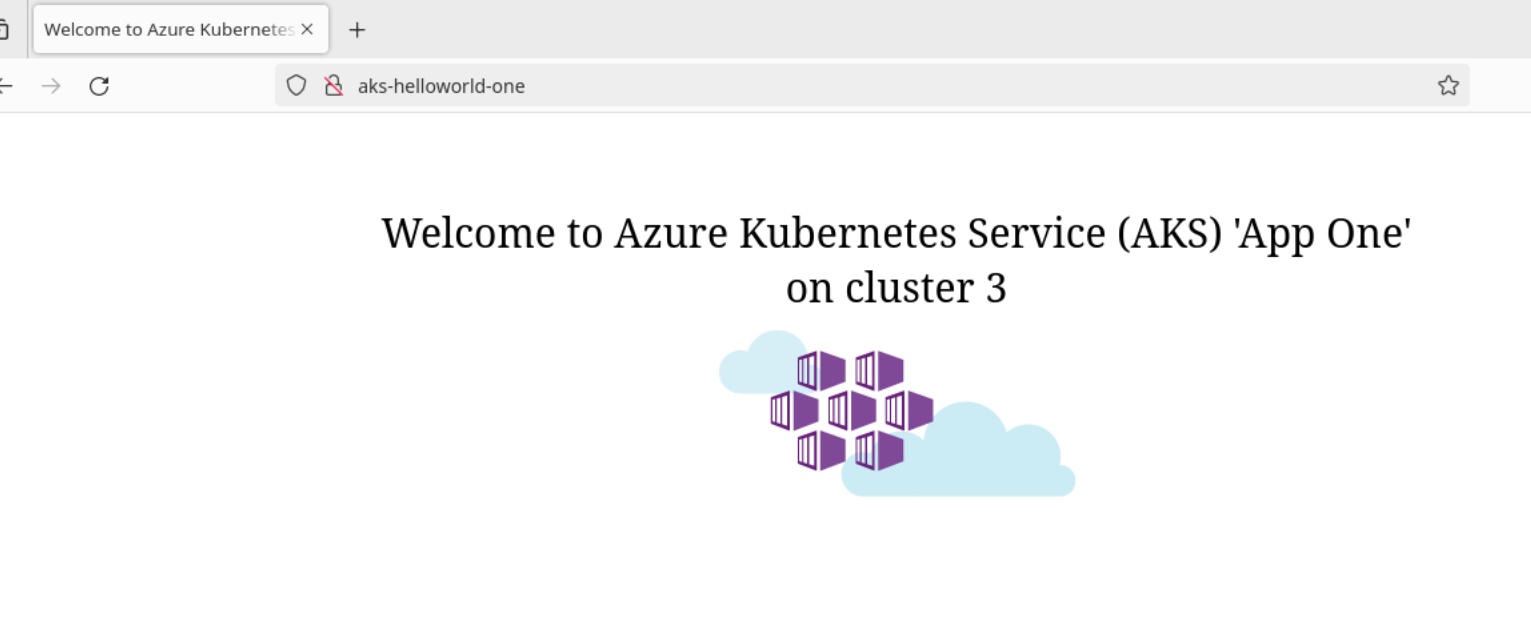
value: "Welcome to Azure Kubernetes Service (AKS) 'App One' on cluster 1"
for each cluster, we will just change the title value and specify the current cluster.
Then we add a service to expose this application. To make it global, we have to specify the annotation service.cilium.io/global and set its value to "true"
apiVersion: v1
kind: Service
metadata:
  name: aks-helloworld-one
  namespace: meshtest
  annotations:
    service.cilium.io/global: "true"
    service.cilium.io/shared: "true"
spec:
  type: ClusterIP
  ports:
  - port: 80
  selector:
    app: aks-helloworld-one
Having access to our 3 meshed clusters, we can deploy on each of those with the --context argument
azureuser@vm1:~$ k config get-contexts
CURRENT   NAME             CLUSTER          AUTHINFO                                    NAMESPACE
*         aks-ciliumlab    aks-ciliumlab    clusterUser_rsg-ciliumlab_aks-ciliumlab
          aks-ciliumlab2   aks-ciliumlab2   clusterUser_rsg-ciliumlab2_aks-ciliumlab2
          aks-ciliumlab3   aks-ciliumlab3   clusterUser_rsg-ciliumlab3_aks-ciliumlab3
It’s not fun to just curl the application to validate its global status, so we’ll add a client application based on a firefox container:
apiVersion: apps/v1
kind: Deployment
metadata:
  creationTimestamp: null
  labels:
    app: fftest
  name: fftest
  namespace: meshtest
spec:
  replicas: 3
  selector:
    matchLabels:
      app: fftest
  strategy: {}
  template:
    metadata:
      creationTimestamp: null
      labels:
        app: fftest
    spec:
      containers:
      - image: linuxserver/firefox
        name: firefox
        resources: {}
status: {}
We can deploy this application on each cluster and then do some tests:
azureuser@vm1:~$ k port-forward -n meshtest deployments/fftest 44301:3001
Forwarding from 127.0.0.1:44301 -> 3001
Forwarding from [::1]:44301 -> 3001
Handling connection for 44301


Note that it may take some time for the container to refresh the connection, so it’s also possible to curl from the pod instead
azureuser@vm1:~$ k exec -n meshtest deployments/fftest -- curl -i -X GET http://aks-helloworld-one
% Total % Received % Xferd Average SpeHTTP/1.1 200 OK
ed Time Time Time Current
Dload Upload Total Spent Left Speed
100 691 10Server: nginx/1.13.7 0 0 --:--:-- --:--:-- --:--:-- 0
Date: Tue, 28 May 2024 20:30:42 GMT
Content-Type: text/html; charset=utf-8
Content-Length: 691
Connection: keep-alive
<!DOCTYPE html>
<html xmlns="http://www.w3.org/1999/xhtml">
<head>
<link rel="stylesheet" type="text/css" href="/static/default.css">
<title>Welcome to Azure Kubernetes Service (AKS) 'App One' on cluster 3</title>
<script language="JavaScript">
function send(form){
}
</script>
</head>
<body>
<div id="container">
<form id="form" name="form" action="/"" method="post"><center>
<div id="logo">Welcome to Azure Kubernetes Service (AKS) 'App One' on cluster 3</div>
<div id="space"></div>
<img src="/static/acs.png" als="acs logo">
<div id="form">
</div>
</div>
</body>
</html>0 691 0 0 42361 0 --:--:-- --:--:-- --:--:-- 46066
azureuser@vm1:~$ k exec -n meshtest deployments/fftest -- curl -i -X GET http://aks-helloworld-one
% Total % Received % Xferd Average Speed Time Time Time Current
Dload Upload Total Spent Left Speed
0 0 0 0 0 0 0 0 --:--:-- --:--:-- --:--:-- 0HTTP/1.1 200 OK
Server: nginx/1.13.7
Date: Tue, 28 May 2024 20:30:45 GMT
Content-Type: text/html; charset=utf-8
Content-Length: 691
Connection: keep-alive
<!DOCTYPE html>
<html xmlns="http://www.w3.org/1999/xhtml">
<head>
<link rel="stylesheet" type="text/css" href="/static/default.css">
<title>Welcome to Azure Kubernetes Service (AKS) 'App One' on cluster 1</title>
<script language="JavaScript">
function send(form){
}
</script>
</head>
<body>
<div id="container">
<form id="form" name="form" action="/"" method="post"><center>
<div id="logo">Welcome to Azure Kubernetes Service (AKS) 'App One' on cluster 1</div>
<div id="space"></div>
<img src="/static/acs.png" als="acs logo">
<div id="form">
</div>
</div>
</body>
100 691 100 691 0 0 124k 0 --:--:-- --:--:-- --:--:-- 134k
Connecting to Hubble, we can see the following:
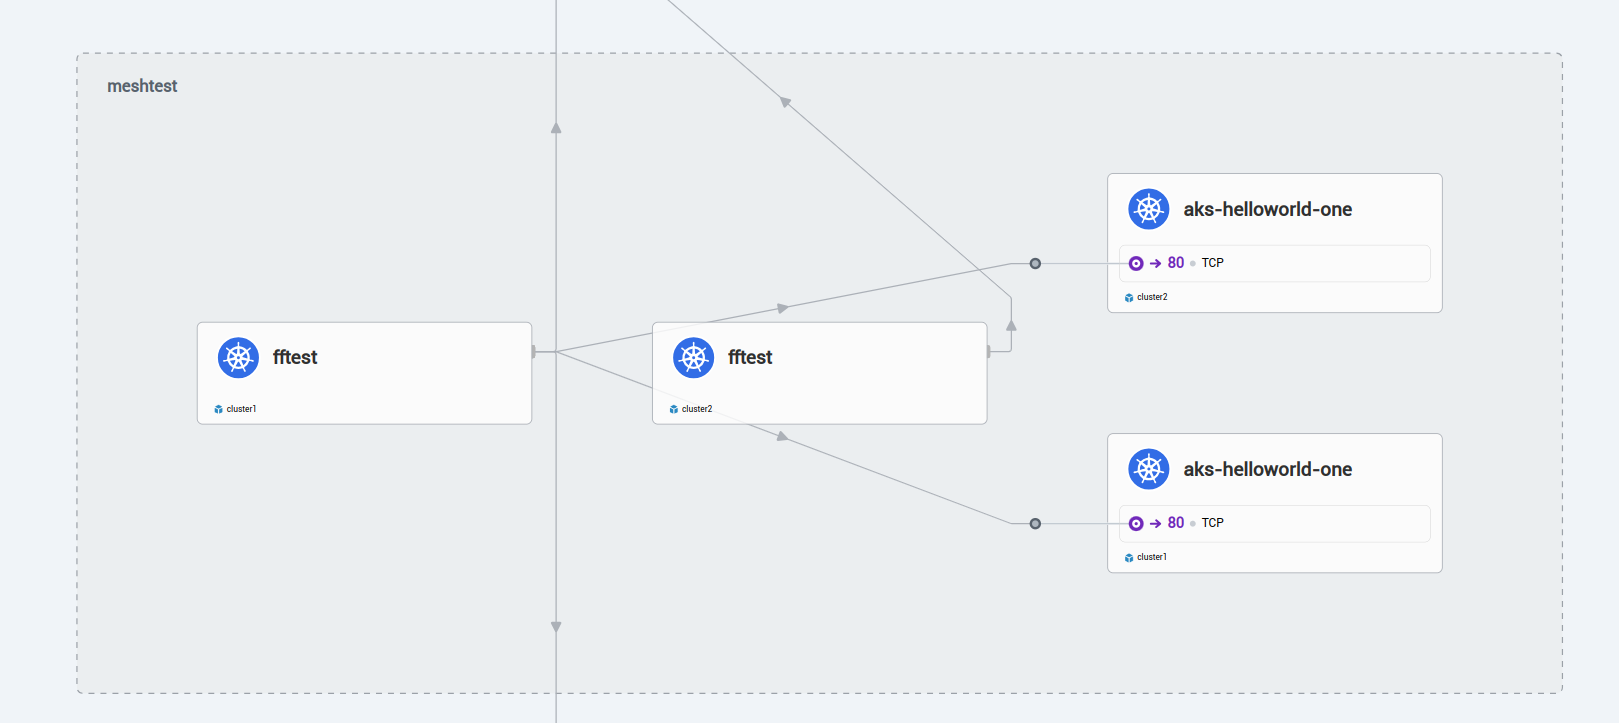
Now that we have global service, we can have a look at the annotation service.cilium.io/shared. If set to "true", the global service is shared, and thus accessible accross all the clusters. If set to "false", the service on the cluster is only accessible locally.
We have another annotation available to manage the affinity of a service. service.cilium.io/affinity can be set to "local|remote|none".
Let’s try to illustrate this.
On cluster 1, we will set the annotation service.cilium.io/shared to "false". On cluster 2, we will set the service.cilium.io/affinity to "remote". Because the cluster1 service is not shared anymore, we should get answer mostly from cluster 3.
azureuser@vm1:~$ k exec -n meshtest deployments/fftest --context aks-ciliumlab2 -- curl -i -X GET http://aks-helloworld-one
% Total % Received % Xferd AveraHTTP/1.1 200 OK
ge Speed Time Time Time Current
Dload Upload Total Spent Left Speed
100 691 100 691 0 0 55444 0 --:--:-- --:--:-- --:--:-- 57583
Server: nginx/1.13.7
Date: Tue, 28 May 2024 21:17:54 GMT
Content-Type: text/html; charset=utf-8
Content-Length: 691
Connection: keep-alive
<!DOCTYPE html>
<html xmlns="http://www.w3.org/1999/xhtml">
<head>
<link rel="stylesheet" type="text/css" href="/static/default.css">
<title>Welcome to Azure Kubernetes Service (AKS) 'App One' on cluster 2</title>
<script language="JavaScript">
function send(form){
}
</script>
</head>
<body>
<div id="container">
<form id="form" name="form" action="/"" method="post"><center>
<div id="logo">Welcome to Azure Kubernetes Service (AKS) 'App One' on cluster 2</div>
<div id="space"></div>
<img src="/static/acs.png" als="acs logo">
<div id="form">
</div>
</div>
</body>
Ok, time to wrap up!
4. Summary
In this article, we explored the cluster mesh with Cilium, from the prerequisite, the set up and some basic testing. There are additional thing to do, such as testing network policies in the mesh context, or testing the encryption. But then, the article would get too long, so we’ll stop here for now. See you soon hopefully 🤓