About Cilium native authentication feature
Hi there!
We’ve been talking about Cilium for some time now, but there are so much thing to look at on this, that we knew we would come back to this topic. Today, I propose that we explore the feature that is available for authenticating workload. Before tackling this topic, We need some definition
Our agenda will be as follow
- Understanding Cilium authentication feature
- Trying out the authentication
Let’s get started!
1. Cilium authentication feature
1.1. Why we need authentication
Security in micro-service based architecture is a huge topic.
In a kubernetes environment, we can look at the network and we implement Zero Trust by restricting traffic to the only needed port and protocol.
In this case, we can rely on network policies.
For example, this policy deny all ingress traffic in the basic namespace
kind: NetworkPolicy
apiVersion: networking.k8s.io/v1
metadata:
  name: default-deny-all
  namespace: basics
spec:
  podSelector: {}
  ingress: []
This policy allows only traffic to the pod with the label app=userprofile on the port 8082 from the pods in the namespace with the labels tier=front and app=tripsinsights.
apiVersion: networking.k8s.io/v1
kind: NetworkPolicy
metadata:
  name: allow-tripviewer-ingress-apiprofile
  namespace: api
spec:
  podSelector:
    matchLabels:
      app: userprofile
  policyTypes:
  - Ingress
  ingress:
  - from:
    - namespaceSelector:
        matchLabels:
          tier: front
          app: tripinsights
    ports:
    - protocol: TCP
      port: 8082
But it may not enough, and it’s quite difficult to manage globally by lack of an centralized management plane. That’s the paradox of the distributed security.
We talked in a previous article of the service mesh which aims to provide a centralized control plane for the network flows. And we’ve seen that in the initiative of standard, we had some specific traffic control object which included authentication feature.
apiVersion: access.smi-spec.io/v1alpha4
kind: IdentityBinding
metadata:
 name: service-a
 namespace: default
spec:
 schemes:
   podLabelSelector:
    matchLabels:
      app: service-a
   spiffeIdentities:
     - "cluster.local/ns/default/sa/service-a"
     - "federated.trustdomain/boundary/boundaryName/identifierType/identifier"
   serviceAccount: service-a
that’s what we will have a look at with Cilium service mesh, and specifically the Identity based security. It’s interesting to have something like that in the infrastructre layer, because it’s not always possible to have authentication included in the applictions layers, specifically when we consider multiservice. At most, unfortunately, we may get authentication on the front end, but not much more. Here, we gt a proposal to add identiy based security.
Let’s have a look at how it works.
1.2. What’s under the hood of authentication in Cilium
Authentication means, at one point, Identities. As hinted in the smi spec earlier, and documented in the Cilium doc, the technology used is SPIFFE, which stands for Secure Production Identity Framework For Everyone. It is also a graduated project in the CNCF since August 2022. Spiffe spec are defined on a dedicated github.
At this point we will remains at a high level overview of the SPIFFE standards, as described on the github repo, which is comprised of:
- The SPIFFE ID, a structured string (represented as a URI) which serves as the “name” of an entity.
- The SPIFFE Verifiable Identity Document (SVID) is a document which carries the SPIFFE ID itself. It is the functional equivalent of a passport - a document which is presented that carries the identity of the presenter.
- The Workload API is the method through which workloads, or compute processes, obtain their SVID(s). It is typically exposed locally (eg. via a Unix domain socket), and explicitly does not include an authentication handshake or authenticating token from the workload.
Also, it’s important to mention the trust domain which is is an identity namespace, backed by an issuing authority with a set of cryptographic keys. Together, these keys serve as the cryptographic anchor for all identities residing in the trust domain.
Again, since SPIFFE is a set of specifications, all of those concepts/standards are actually detailed in the github repository.
So now we know about specification and standards, but there is a lot to do yet, because, well, it’s only the specification. Fortunately, there is also the SPIRE project, another graduated CNCF project, which is a production ready implementation of the SPIFFE spec.
In Cilium, SPIFFE implementation is based on a SPIRE central server. This SPIRE server takes the role of the trust domain that we mentionned earlier in the spec and standards. It works with SPIRE agents, one per node, which get its own identity from the server, then validate the identity requests form the workloads.
To understand how SPIRE works, we need again some concepts:
- The workload registration is the process by which SPIRE will be able to identify the said workload. It tells SPIRE how to identify the workload and which SPIFFE ID to give it.
- SPIRE achieve the Attestation of a workload, a.k.a asserting its identity, by gathering attributes from the workload, and the node running the SPIRE agent. It’s interesting also to note that the attestation is done by pieces of software called attestators. In our case, we will have a kubernetes attestator for the kubernetes-hosted workloads, but also the node attestator for the SPIRE agents, that need to register first before being able to proced with the workload attestation. On Azure, the node attestation/registration relies on Azure VMs with managed identity.
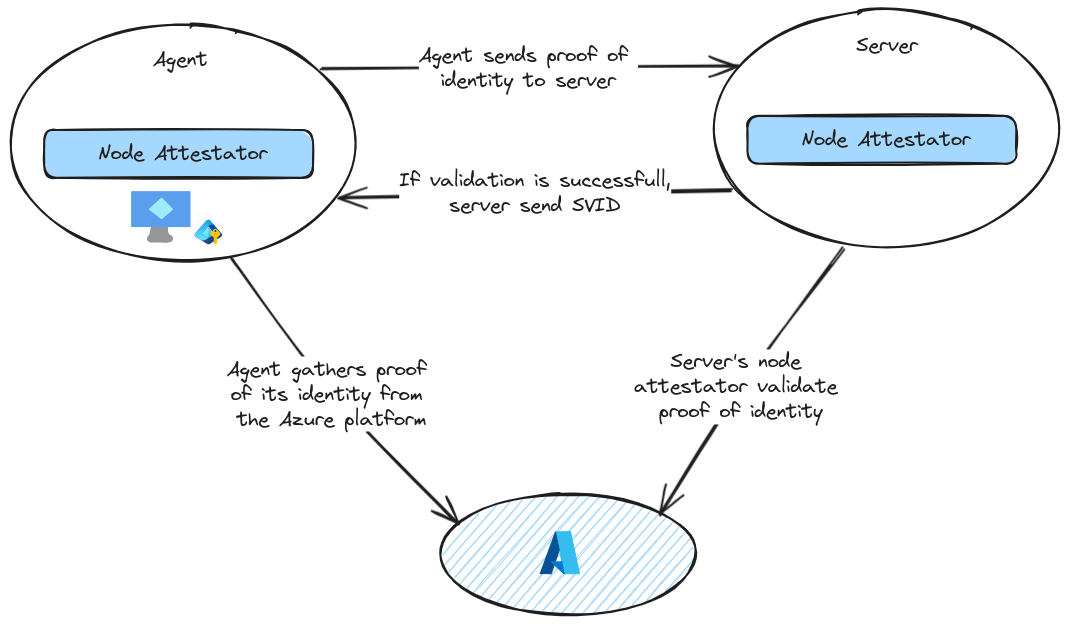
The Node attestation follows the below steps:
- The agent node attestor plugin queries the platform for proof of the node’s identity and gives that information to the agent.
- The agent passes this proof of identity to the server. The server passes this data to its node attestor.
- The Server node attestor validates proof of identity by calling out to the platform API, using the information it obtained in step 2. The node attestor also creates a SPIFFE ID for the agent, and passes this back to the server process, along with any node selectors it discovered.
- The server sends back an SVID for the agent node.
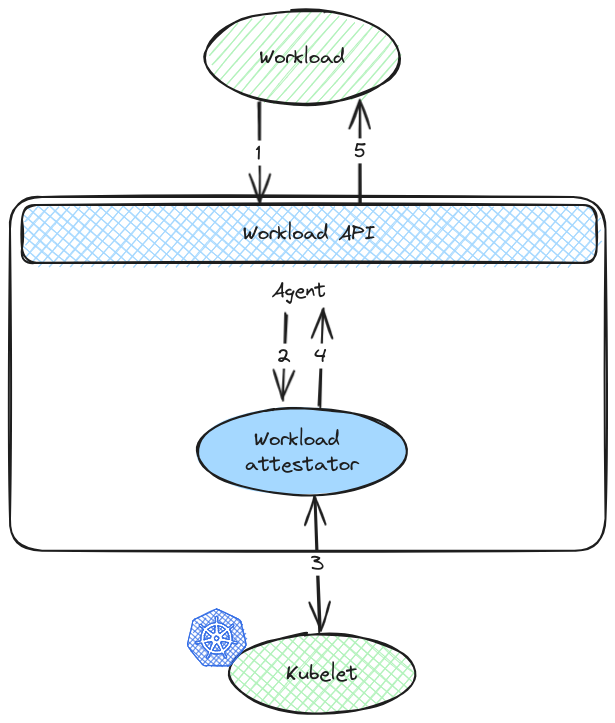
A workload requesting an identity follows the below steps:
- It calls the Workload API exposed by the agent to request an SVID.
- The agent interrogates invokes the workload attestor plugins, providing it with the informations about the workload.
- Workload attestors discover additional information about the workload, querying neighboring platform-specific components – such as a Kubernetes kubelet.
- The attestors return the discovered information to agent in the form of selectors.
- The agent determines the workload’s identity by comparing discovered selectors to registration entries, and returns the correct cached SVID to the workload.
Ok, that’s about it for this overview. There are more details in SPIFFE specifications and I can only recommand a more thorough read for a better understanding. Let’s have a look at how it goes when we deploy that in an AKS cluster.
2. Trying Cilium authentication
2.1. Preparing the environment
To try this feature, we’ll use a environment with simply an AKS cluster and its default node pool, in a virtual network.
The authentication requires to be specified at the install of cilium, with the parameters authentication.mutual.spire.enabled and authentication.mutual.spire.install.enabled to be set to true.
The full list of the helm parameters that we used are summarized below
| Helm parameter | Value | Description |
|---|---|---|
| hubble.relay.enabled | true | Enable Hubble Relay |
| hubble.ui.enabled | true | Whether to enable the Hubble UI |
| aksbyocni.enabled | true | Enable AKS BYOCNI integration. Note that this is incompatible with AKS clusters not created in BYOCNI mode: use Azure integration (azure.enabled) instead. |
| nodeinit.enabled | true | Enable the node initialization DaemonSet |
| kubeProxyReplacement | true | Replace kubeproxy |
| k8sServiceHost | “ |
Kubernetes service host - use “auto” for automatic lookup from the cluster-info ConfigMap (kubeadm-based clusters only) |
| k8sServicePort | 443 | string “” Kubernetes service port |
| cluster.id | 1 | Unique ID of the cluster. Must be unique across all connected clusters and in the range of 1 to 255. Only required for Cluster Mesh, may be 0 if Cluster Mesh is not used. |
| cluster.name | “ |
Name of the cluster. Only required for Cluster Mesh and mutual authentication with SPIRE. It must respect the following constraints: * It must contain at most 32 characters; * It must begin and end with a lower case alphanumeric character; * It may contain lower case alphanumeric characters and dashes between. The “default” name cannot be used if the Cluster ID is different from 0. |
| azure.resourceGroup | “ |
The AKS resource group |
| ipam.operator.clusterPoolIPv4PodCIDRList | “{Ip_Range}” | PoolIPv4PodCIDRList list [“10.0.0.0/8”] IPv4 CIDR list range to delegate to individual nodes for IPAM. |
| prometheus.enabled | true | Enable metrics for prometheus |
| operator.prometheus.enabled | true | Enables exporting hubble metrics in OpenMetrics format. |
| hubble.metrics.enableOpenMetrics | false | Enables exporting hubble metrics in OpenMetrics format. |
| hubble.metrics.enabled | “{dns,drop,tcp,flow,port-distribution,icmp,httpV2:exemplars=true;labelsContext=source_ip,source_namespace,source_workload,destination_ip,destination_namespace,destination_workload,traffic_direction}” | Configures the list of metrics to collect. If empty or null, metrics are disabled. Example: enabled: - dns:query;ignoreAAAA - drop - tcp - flow - icmp - http You can specify the list of metrics from the helm CLI: –set hubble.metrics.enabled=”{dns:query;ignoreAAAA,drop,tcp,flow,icmp,http}” |
| authentication.mutual.spire.enabled | true | utual.spire.enabled bool false Enable SPIRE integration (beta) |
| authentication.mutual.spire.install.enabled | true | ion.mutual.spire.install.enabled bool true Enable SPIRE installation. This will only take effect only if authentication.mutual.spire.enabled is true |
Once the installation is complete, we can have a look at the status of cilium.
yumemaru@azure:~$ cilium status
    /¯¯\
 /¯¯\__/¯¯\    Cilium:             OK
 \__/¯¯\__/    Operator:           OK
 /¯¯\__/¯¯\    Envoy DaemonSet:    OK
 \__/¯¯\__/    Hubble Relay:       OK
    \__/       ClusterMesh:        disabled

Deployment             hubble-ui          Desired: 1, Ready: 1/1, Available: 1/1
DaemonSet              cilium-envoy       Desired: 3, Ready: 3/3, Available: 3/3
DaemonSet              cilium             Desired: 3, Ready: 3/3, Available: 3/3
Deployment             hubble-relay       Desired: 1, Ready: 1/1, Available: 1/1
Deployment             cilium-operator    Desired: 2, Ready: 2/2, Available: 2/2
Containers:            cilium             Running: 3
                       hubble-ui          Running: 1
                       cilium-envoy       Running: 3
                       cilium-operator    Running: 2
                       hubble-relay       Running: 1
Cluster Pods:          29/29 managed by Cilium
Helm chart version:    1.16.0
Image versions         cilium             quay.io/cilium/cilium:v1.16.0@sha256:46ffa4ef3cf6d8885dcc4af5963b0683f7d59daa90d49ed9fb68d3b1627fe058: 3
                       hubble-ui          quay.io/cilium/hubble-ui:v0.13.1@sha256:e2e9313eb7caf64b0061d9da0efbdad59c6c461f6ca1752768942bfeda0796c6: 1
                       hubble-ui          quay.io/cilium/hubble-ui-backend:v0.13.1@sha256:0e0eed917653441fded4e7cdb096b7be6a3bddded5a2dd10812a27b1fc6ed95b: 1
                       cilium-envoy       quay.io/cilium/cilium-envoy:v1.29.7-39a2a56bbd5b3a591f69dbca51d3e30ef97e0e51@sha256:bd5ff8c66716080028f414ec1cb4f7dc66f40d2fb5a009fff187f4a9b90b566b: 3
                       cilium-operator    quay.io/cilium/operator-generic:v1.16.0@sha256:d6621c11c4e4943bf2998af7febe05be5ed6fdcf812b27ad4388f47022190316: 2
                       hubble-relay       quay.io/cilium/hubble-relay:v1.16.0@sha256:33fca7776fc3d7b2abe08873319353806dc1c5e07e12011d7da4da05f836ce8d: 1
And we can also look at the additional kubernetes objets:
- A deployment for SPIRE server
- A daemonset for the agent, running on each nodes.
yumemaru@azure:~$ k get all -n cilium-spire
NAME                    READY   STATUS    RESTARTS   AGE
pod/spire-agent-65sh2   1/1     Running   0          7h2m
pod/spire-agent-hqnsm   1/1     Running   0          7h2m
pod/spire-agent-lcqrz   1/1     Running   0          7h2m
pod/spire-server-0      2/2     Running   0          24h

NAME                   TYPE        CLUSTER-IP    EXTERNAL-IP   PORT(S)    AGE
service/spire-server   ClusterIP   100.65.61.5   <none>        8081/TCP   27h

NAME                         DESIRED   CURRENT   READY   UP-TO-DATE   AVAILABLE   NODE SELECTOR   AGE
daemonset.apps/spire-agent   3         3         3       3            3           <none>          27h

NAME                            READY   AGE
statefulset.apps/spire-server   1/1     27h
Before going to some tests, let’s have a look at our spire server. We can find commands to look at it on the corresponding documentation.
First we can check the spire server health:
yumemaru@azure:~$ kubectl exec -n cilium-spire spire-server-0 -c spire-server -- /opt/spire/bin/spire-server healthcheck
Server is healthy.
Then we can have a look at the spire agents and their attested status. Because we have 3 nodes, we have 3 pods in the daemonsets
yumemaru@azure:~$ k get ds -n cilium-spire
NAME          DESIRED   CURRENT   READY   UP-TO-DATE   AVAILABLE   NODE SELECTOR   AGE
spire-agent   3         3         3       3            3           <none>          27h

yumemaru@azure:~$ kubectl exec -n cilium-spire spire-server-0 -c spire-server -- /opt/spire/bin/spire-server agent list
Found 3 attested agents:

SPIFFE ID         : spiffe://spiffe.cilium/spire/agent/k8s_psat/cluster1/c0c6afc3-1e0a-4ffb-b61e-18442b04123d
Attestation type  : k8s_psat
Expiration time   : 2024-07-30 17:27:15 +0000 UTC
Serial number     : 8338212869267325996294354393424215766
Can re-attest     : true

SPIFFE ID         : spiffe://spiffe.cilium/spire/agent/k8s_psat/cluster1/08af80d6-0166-4f46-b575-0aa0dc6a5152
Attestation type  : k8s_psat
Expiration time   : 2024-07-30 17:27:15 +0000 UTC
Serial number     : 317183292034746089049553637864798125627
Can re-attest     : true

SPIFFE ID         : spiffe://spiffe.cilium/spire/agent/k8s_psat/cluster1/bdd0dfa9-20ec-4f24-a82f-c646754588ce
Attestation type  : k8s_psat
Expiration time   : 2024-07-30 17:27:15 +0000 UTC
Serial number     : 215301213544348190052950735212628656167
Can re-attest     : true
Then we can check the SPIFFE identities.
yumemaru@azure:~$ kubectl exec -n cilium-spire spire-server-0 -c spire-server -- /opt/spire/bin/spire-server entry show -parentID spiffe://spiffe.cilium/ns/cilium-spire/sa/spire-agent
Found 2 entries
Entry ID         : 53b6506b-ebe3-4cd8-89b4-9647fa535c37
SPIFFE ID        : spiffe://spiffe.cilium/cilium-agent
Parent ID        : spiffe://spiffe.cilium/ns/cilium-spire/sa/spire-agent
Revision         : 0
X509-SVID TTL    : default
JWT-SVID TTL     : default
Selector         : k8s:ns:kube-system
Selector         : k8s:sa:cilium

Entry ID         : 8c361104-31a1-480e-b97d-83673a63ce72
SPIFFE ID        : spiffe://spiffe.cilium/cilium-operator
Parent ID        : spiffe://spiffe.cilium/ns/cilium-spire/sa/spire-agent
Revision         : 0
X509-SVID TTL    : default
JWT-SVID TTL     : default
Selector         : k8s:ns:kube-system
2.2. Using mutual authentication
Now let’s deploy some workoads. To keep things simple, we will create a bunch of nginx-based deployment:
A target application:
apiVersion: apps/v1
kind: Deployment
metadata:
  labels:
    app: demodeployment
  name: demodeployment
spec:
  replicas: 3
  selector:
    matchLabels:
      app: demodeployment
  strategy: {}
  template:
    metadata:
      labels:
        app: demodeployment
    spec:
      containers:
      - image: nginx
        name: nginx
        resources: {}
status: {}
---
apiVersion: v1
kind: Service
metadata:
  labels:
    app: demodeployment
  name: demodeployment
spec:
  ports:
  - port: 80
    protocol: TCP
    targetPort: 80
  selector:
    app: demodeployment
status:
  loadBalancer: {}
And clients:
apiVersion: apps/v1
kind: Deployment
metadata:
  labels:
    app: client1
  name: client1
spec:
  replicas: 3
  selector:
    matchLabels:
      app: client1
  strategy: {}
  template:
    metadata:
      labels:
        app: client1
    spec:
      containers:
      - image: nginx
        name: nginx
        resources: {}
status: {}
---
apiVersion: apps/v1
kind: Deployment
metadata:
  labels:
    app: client2
  name: client2
spec:
  replicas: 3
  selector:
    matchLabels:
      app: client2
  strategy: {}
  template:
    metadata:
      labels:
        app: client2
    spec:
      containers:
      - image: nginx
        name: nginx
        resources: {}
status: {}
If we have a look at the cilium endpoints, we should see information on the associated identities:
yumemaru@azure:~$ k get ciliumendpoint -o wide
NAME                             SECURITY IDENTITY   INGRESS ENFORCEMENT   EGRESS ENFORCEMENT   VISIBILITY POLICY   ENDPOINT STATE   IPV4           IPV6
client1-599c487979-dqm4v         76513                                                                              ready            100.64.1.197
client1-599c487979-qqzvl         76513                                                                              ready            100.64.0.206
client1-599c487979-t8728         76513                                                                              ready            100.64.2.214
client2-d64dd865b-cj56m          77602                                                                              ready            100.64.0.77
client2-d64dd865b-kb7cs          77602                                                                              ready            100.64.1.51
client2-d64dd865b-qskqc          77602                                                                              ready            100.64.2.25
demodeployment-bf5d895b5-6s4xn   108597                                                                             ready            100.64.0.124
demodeployment-bf5d895b5-pmzkm   108597                                                                             ready            100.64.1.244
demodeployment-bf5d895b5-vz4gq   108597                                                                             ready            100.64.2.127
With the security identity value, we can check the corresponding identity on the spire server. We’ll use
'{.items[0].status.identity.id}' as a jsonpath value to extract the security identities as variables.
yumemaru@azure:~$ k get deployment --show-labels
NAME             READY   UP-TO-DATE   AVAILABLE   AGE   LABELS
client1          3/3     3            3           14h   app=client1
client2          3/3     3            3           14h   app=client2
demodeployment   3/3     3            3           15h   app=demodeployment
yumemaru@azure:~$ export client1=$(k get ciliumendpoints.cilium.io -l app=client1 -o=jsonpath='{.items[0].status.identity.id}')
yumemaru@azure:~$ export client2Id=$(k get ciliumendpoints.cilium.io -l app=client2 -o=jsonpath='{.items[0].status.identity.id}')
yumemaru@azure:~$ export demoId=$(k get ciliumendpoints.cilium.io -l app=demodeployment -o=jsonpath='{.items[0].status.identity.id}')
Inside the spire server pod, we can now check the corresponding identities to each workload:
yumemaru@azure:~$ kubectl exec -n cilium-spire spire-server-0 -c spire-server -- /opt/spire/bin/spire-server entry show -spiffeID spiffe://spiffe.cilium/identity/$client1Id
Found 1 entry
Entry ID         : 7bf9a3b0-a06c-480e-8f0c-1fd654d3ec56
SPIFFE ID        : spiffe://spiffe.cilium/identity/76513
Parent ID        : spiffe://spiffe.cilium/cilium-operator
Revision         : 0
X509-SVID TTL    : default
JWT-SVID TTL     : default
Selector         : cilium:mutual-auth

yumemaru@azure:~$ kubectl exec -n cilium-spire spire-server-0 -c spire-server -- /opt/spire/bin/spire-server entry show -spiffeID spiffe://spiffe.cilium/identity/$client2Id
Found 1 entry
Entry ID         : 62b158d0-c90b-449a-9b30-a8a24ba012ba
SPIFFE ID        : spiffe://spiffe.cilium/identity/77602
Parent ID        : spiffe://spiffe.cilium/cilium-operator
Revision         : 0
X509-SVID TTL    : default
JWT-SVID TTL     : default
Selector         : cilium:mutual-auth

yumemaru@azure:~$ kubectl exec -n cilium-spire spire-server-0 -c spire-server -- /opt/spire/bin/spire-server entry show -spiffeID spiffe://spiffe.cilium/identity/$demoId
Found 1 entry
Entry ID         : 07f27f3c-7a94-450b-aecc-bb006f57b97e
SPIFFE ID        : spiffe://spiffe.cilium/identity/108597
Parent ID        : spiffe://spiffe.cilium/cilium-operator
Revision         : 0
X509-SVID TTL    : default
JWT-SVID TTL     : default
Selector         : cilium:mutual-auth
But also the identities directly as cilium api objects. Below is the result for client1 app
yumemary@azure:~$ k describe ciliumidentities.cilium.io $client1Id
Name:         76513
Namespace:
Labels:       app=client1
              io.cilium.k8s.policy.cluster=cluster1
              io.cilium.k8s.policy.serviceaccount=default
              io.kubernetes.pod.namespace=default
Annotations:  <none>
API Version:  cilium.io/v2
Kind:         CiliumIdentity
Metadata:
  Creation Timestamp:  2024-07-30T16:46:43Z
  Generation:          1
  Resource Version:    224640
  UID:                 433dd70b-58ba-41c0-abef-c9d5785eaddb
Security - Labels:
  k8s:app:                                                         client1
  k8s:io.cilium.k8s.namespace.labels.kubernetes.io/metadata.name:  default
  k8s:io.cilium.k8s.policy.cluster:                                cluster1
  k8s:io.cilium.k8s.policy.serviceaccount:                         default
  k8s:io.kubernetes.pod.namespace:                                 default
Events:                                                            <none>
We’ll note the correspondance between the Cilium identity name, the security identity displayed on the Cilium endpoint, and the SPIFFE ID spiffe://spiffe.cilium/identity/76513 we got on the spire server.
Ok that’s fine. Now, how do we enforce mutual authentication? Well quite easily in fact, we just need to add the appropriate argument in the Cilium network policy:
authentication:
    mode: "required"
Let’s write 3 network policies:
- First, as it should be, a deny all policy.
apiVersion: "cilium.io/v2"
kind: CiliumNetworkPolicy
metadata:
  name: "demo1-default-deny"
  namespace: default
spec:
  description: "Default-deny ingress policy for demo app"
  endpointSelector:
    matchLabels:
      app: demodeployment
  ingress:
  - {}
- Second, a policy allowing the traffic for app1 to the demo app.
apiVersion: cilium.io/v2
kind: CiliumNetworkPolicy
metadata:
  name: allowclient1noauth
spec:
  endpointSelector:
    matchLabels:
      app: demodeployment
  ingress:
  - fromEndpoints:
    - matchLabels:
        app: client1
    toPorts:
    - ports:
      - port: "80"
        protocol: TCP
- Third, a network policy allowing app2 to demo app, but this time requiring the authentication.
apiVersion: cilium.io/v2
kind: CiliumNetworkPolicy
metadata:
  name: allowclient2withauth
spec:
  endpointSelector:
    matchLabels:
      app: demodeployment
  ingress:
  - fromEndpoints:
    - matchLabels:
        app: client2
    authentication:
      mode: "required"
    toPorts:
    - ports:
      - port: "80"
        protocol: TCP
If we apply just the first one, we should not be able to access the demo app anymore. This is visible with hubble observe command
yumemary@azure:~$ k exec deployments/client1 -- curl -i -X GET http://demodeployment
  % Total    % Received % Xferd  Average Speed   Time    Time     Time  Current
                                 Dload  Upload   Total   Spent    Left  Speed
  0     0    0     0    0     0      0      0 --:--:--  0:02:09 --:--:--     0
curl: (28) Failed to connect to demodeployment port 80 after 129180 ms: Couldn't connect to server
command terminated with exit code 28
yumemary@azure:~$ hubble observe --to-label app=demodeployment
Jul 31 09:54:42.541: default/client1-599c487979-t8728:54548 (ID:76513) -> default/demodeployment-bf5d895b5-pmzkm:80 (ID:108597) to-overlay FORWARDED (TCP Flags: SYN)
We can still, however, access one pod of client2 deployment, since we only targeted the demo app with its label.
yumemary@azure:~$ k get pod -o custom-columns=Name:.metadata.name,PodIp:.status.podIP,HostIp:.status.hostIP
Name                             PodIp          HostIp
client1-599c487979-dqm4v         100.64.1.197   172.21.14.69
client1-599c487979-qqzvl         100.64.0.206   172.21.14.68
client1-599c487979-t8728         100.64.2.214   172.21.14.70
client2-d64dd865b-cj56m          100.64.0.77    172.21.14.68
client2-d64dd865b-kb7cs          100.64.1.51    172.21.14.69
client2-d64dd865b-qskqc          100.64.2.25    172.21.14.70
client3-6fbfd96c6f-bwhqh         100.64.1.150   172.21.14.69
client3-6fbfd96c6f-cfhhv         100.64.0.91    172.21.14.68
client3-6fbfd96c6f-wldx5         100.64.2.95    172.21.14.70
demodeployment-bf5d895b5-6s4xn   100.64.0.124   172.21.14.68
demodeployment-bf5d895b5-pmzkm   100.64.1.244   172.21.14.69
demodeployment-bf5d895b5-vz4gq   100.64.2.127   172.21.14.70
yumemary@azure:~$ k exec deployments/client1 -- curl -i -X GET http://100.64.2.25
  % Total    % Received % Xferd  Average Speed   Time    Time     Time  Current
                                 Dload  Upload   Total   Spent    Left  Speed
100   615  100   615    0     0   499k      0 --:--:-- --:--:-- --:--:--  600k
HTTP/1.1 200 OK
Server: nginx/1.27.0
Date: Wed, 31 Jul 2024 10:01:58 GMT
Content-Type: text/html
Content-Length: 615
Last-Modified: Tue, 28 May 2024 13:22:30 GMT
Connection: keep-alive
ETag: "6655da96-267"
Accept-Ranges: bytes

<!DOCTYPE html>
<html>
<head>
<title>Welcome to nginx!</title>
<style>
html { color-scheme: light dark; }
body { width: 35em; margin: 0 auto;
font-family: Tahoma, Verdana, Arial, sans-serif; }
</style>
</head>
<body>
<h1>Welcome to nginx!</h1>
<p>If you see this page, the nginx web server is successfully installed and
working. Further configuration is required.</p>

<p>For online documentation and support please refer to
<a href="http://nginx.org/">nginx.org</a>.<br/>
Commercial support is available at
<a href="http://nginx.com/">nginx.com</a>.</p>

<p><em>Thank you for using nginx.</em></p>
</body>
</html>
Let’s enforce both policy 2 and 3. If we curl the demo app from client 1 with the command kubectl exec deployments/<deploymentname> -- curl -i -X GET http://demodeployment for both client1 and client2, we can see with hubble the traffic authorized for client1:
yumemary@azure:~$ hubble observe --to-label app=demodeployment --from-label app=client1
Jul 31 11:33:48.647: default/client1-599c487979-t8728:54594 (ID:76513) <> default/demodeployment-bf5d895b5-vz4gq (ID:108597) pre-xlate-rev TRACED (TCP)
Jul 31 11:33:48.647: default/client1-599c487979-t8728 (ID:76513) <> default/demodeployment-bf5d895b5-vz4gq:80 (ID:108597) post-xlate-fwd TRANSLATED (TCP)
Jul 31 11:33:48.647: default/client1-599c487979-t8728:54594 (ID:76513) -> default/demodeployment-bf5d895b5-vz4gq:80 (ID:108597) policy-verdict:L3-L4 INGRESS ALLOWED (TCP Flags: SYN)
Jul 31 11:33:48.647: default/client1-599c487979-t8728:54594 (ID:76513) -> default/demodeployment-bf5d895b5-vz4gq:80 (ID:108597) to-endpoint FORWARDED (TCP Flags: SYN)
Jul 31 11:33:48.647: default/client1-599c487979-t8728:54594 (ID:76513) -> default/demodeployment-bf5d895b5-vz4gq:80 (ID:108597) to-endpoint FORWARDED (TCP Flags: ACK)
And the authentication step for client2:
yumemary@azure:~$ hubble observe --to-label app=demodeployment --from-label app=client2
Jul 31 11:35:18.651: default/client2-d64dd865b-qskqc (ID:77602) <> default/demodeployment-bf5d895b5-6s4xn:80 (ID:108597) post-xlate-fwd TRANSLATED (TCP)
Jul 31 11:35:18.651: default/client2-d64dd865b-qskqc:50986 (ID:77602) -> default/demodeployment-bf5d895b5-6s4xn:80 (ID:108597) to-overlay FORWARDED (TCP Flags: SYN)
Jul 31 11:35:18.651: default/client2-d64dd865b-qskqc:50986 (ID:77602) <> default/demodeployment-bf5d895b5-6s4xn:80 (ID:108597) policy-verdict:L3-L4 INGRESS DENIED (TCP Flags: SYN; Auth: SPIRE)
Jul 31 11:35:18.651: default/client2-d64dd865b-qskqc:50986 (ID:77602) <> default/demodeployment-bf5d895b5-6s4xn:80 (ID:108597) Authentication required DROPPED (TCP Flags: SYN)
Jul 31 11:35:19.661: default/client2-d64dd865b-qskqc:50986 (ID:77602) -> default/demodeployment-bf5d895b5-6s4xn:80 (ID:108597) policy-verdict:L3-L4 INGRESS ALLOWED (TCP Flags: SYN; Auth: SPIRE)
Jul 31 11:35:19.661: default/client2-d64dd865b-qskqc:50986 (ID:77602) -> default/demodeployment-bf5d895b5-6s4xn:80 (ID:108597) to-endpoint FORWARDED (TCP Flags: SYN)
There’s a little delay for client2 to connect to demo app. And that’s because authentication occurs. And we can see it in hubble.
Ok let’s wrap it.
3. Summary
In this article, we went a little deeper in Cilium features, looking at its mutual authentication capabilities coming from the service mesh. This feature relies on a spire server deployment that implement the SPIFFE framework. After that, it’s finally quite simple. A single specification in the network policy ensure that the workload are authenticated together. And it’s also quite easy to see it on with hubble. The next step should be to configure more monitoring on the hubble part but also on the spire server. That’s why the metric related values are added in the chart configuration. For now it’s not working for me so I’ll have to come back to this later. There’s also some thoughts required on the observability of the spire serve. Probably looking at the logs with loki or something similar whould be nice. But that will be for another time 😎