A look at HashiCorp Vault - Getting started
It’s been a long time coming! I decided to start seriously looking into HashiCorp Vault. I love the product but by lack of time, never started the journey. So what better way to start than initiating a few blog posts on the topic 😋
This article is Vault 101, so we’ll look at the basics.
The Agenda:
- What is Vault
- A local lab with Vagrant
- Basics with Vault
Let’s get started!
1. What is Vault
I wonder if we really need to introduce Vault. It’s becoming something of a must have in the secrets management landscape (among others things).
But well, just to be thorough, let’s describe what we have.
Vault from HashiCorp is a identity-based Secrets and Encryption management system. Right, which means? 😅
Well, if, like me, you’re dealing in a Public Cloud environment, you probably came across times when you needed to store, and even more, manage secrets. Those secrets being passwords, keys, or certificates.
If, again, like me, you’re dealing with Azure, you probably also came across Azure Keyvault, which, all in all, could be described as a vault as a service.
Notice the lack of capital V here. When I say vault, it means the concepts of vault to securely store secrets.
Well, Vault (with a capital V) is also a vault as a service but also so much more.
Obviously, because it’s so much more, it also comes with much more management to do.
So for now, let’s admit that Vault is one way to push the secret management to the next level.
Considering a (very) higl level view of the architecture, we can consider 3 main elements
- The Vault API
- The Vault Backend Storage
- The Vault core components
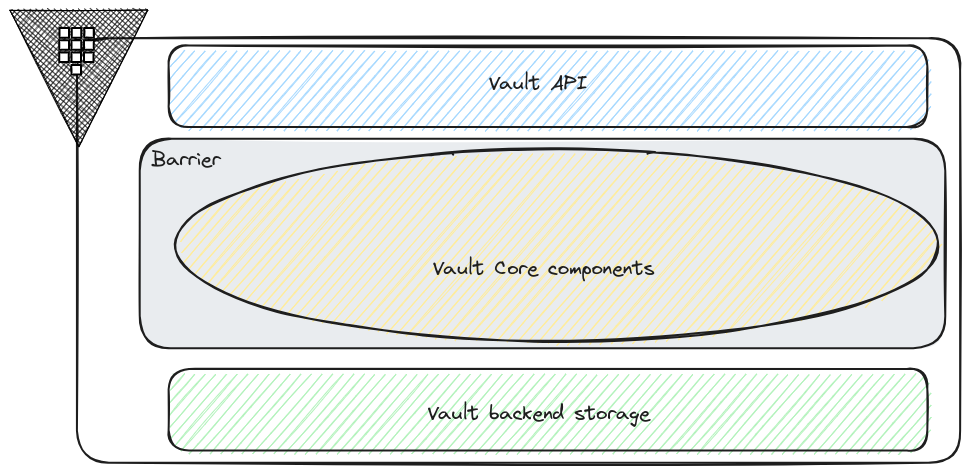
The Vault API, as one would expect, is the entry point to access Vault components.
Those components are the core of Vault functionnalities. We have for instance, the secrets engines, the authentication methods or the token store. Things that we will have a look at when we go deeper in our Vault journey.
Because all of those components interact with sensitive data, they’re included in what is called the Barrier, the Vault encryption layer. Inside this barrier occurs the encryption/decryption actions.
We’ll note that the backend storage is outside of the barrier, meaning that it’s not trusted. And that’s why Vault encrypt the data before sending data to be written to the storage.
About encryption, there are some important things to get. As we mentionned, everything is encrypted. There is a key that is used for those encryptions actions, which is called, guess what? The Encryption key. To protect this Encryption key, we use a root key. As mentionned on theseal documentation page, at startup, the server is sealed, so it does know where is its storage, but has not the means to decrypt the data stored. Getting the root key that allows access the data, which is also getting the Encryption key is called unseal. That’s what we do at startup, and we’ll see it a bit later, with the key shared a.k.a the Shamir seals. From the Shamir Seals, we rebuilt the root key to get access to the Encryption key. We’ll see also that there are other means to get the root key.
For more details on the architecture, it’s possible to refer to the Vault architecture page.
Now, still about the architecture, there are considerations for High availability, but I prefer to keep that for another time.
Which leaves us with one topic to introduce a little bit more: the backend storage.
Vault writes everything that need to be persisted in its backend storage, which makes this storage highly critical. We already mentionned that everything was encrypted before being written. Let’s focus a bit more on what we can use as a backend storage.
We have a lot of choice actually, but only 2 categories, from Vault architecture point of view:
- Integrated storage
- External storage
In the external storage, we can find many well known storage options, either in the relational database family, or in the cloud storage area. Example include:
- Azure storage
- AWS S3
- Google storage
- Postgresql
- MySql
- Cassandra
A more exhaustive list can be found on the documentation.
All of those options are well proven in traditional and cloud native architecture, and it can makes sense to choose from one of those. However, the Integrated storage option is nowadays the recommended solution from HashiCorp. Taking into considerations the following table, extracted, again, from the documentation, it does make sense:
| Integrated Storage | External Storage | |
|---|---|---|
| HashiCorp Supported | Yes | Limited support |
| Operation | Operationally simpler with no additional software installation required. | Must install and configure the external storage environment outside of Vault. For high availability, the external storage should be clustered. |
| Networking | One less network hop. | Extra network hop between Vault and the external storage system (e.g., Consul cluster). |
| Troubleshooting and monitoring | Integrated Storage is a part of Vault; therefore, Vault is the only system you need to monitor and troubleshoot. | The source of failure could be the external storage; therefore, you need to check the health of both Vault and the external storage. This requires expertise in the chosen storage backend and additional monitoring of that storage. |
| Data location | The encrypted Vault data is stored on the same host where the Vault server process runs. | The encrypted Vault data is stored where the external storage is located. Therefore, the Vault server and the data storage are hosted on physically separate hosts. |
Now that we’ve read the marketing part, let’s dig a little in the underlying technology of this integrated storage.
It relies on the Raft Consensus Algorithm, which, simply put, allows to replicate data and maintain consistency between multiple nodes. When data is submitted to the leader node by a client, it will interact with the others nodes to replicate the data, validate it was propagated and then commit and validate the new state. This is called the distributed consensus.
In the schema below, node1 is the leader, and the other nodes are followers.
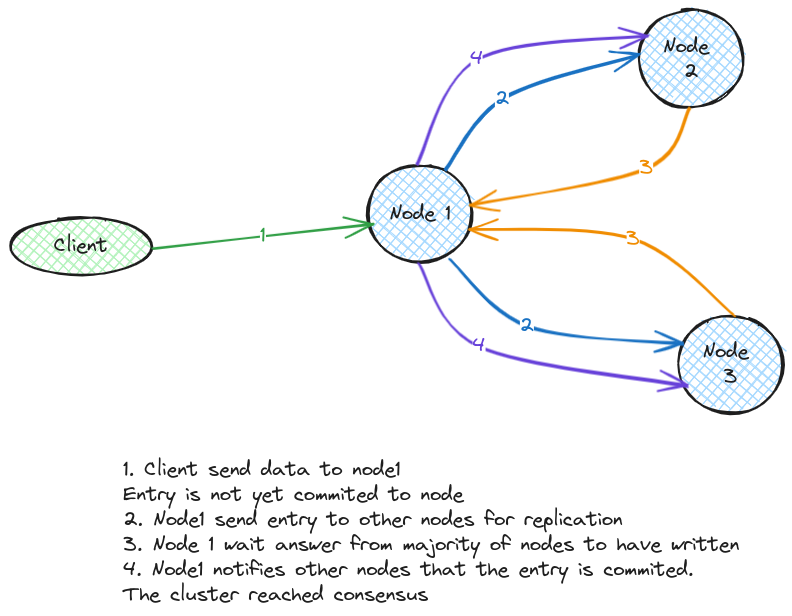
A very nice explanation is available on the secret live of data.
Another critical point to remember is the number of nodes, which should always be odd. That’s related to the leader election, important in the high availability also. But we’ll keep that for another time. Now it’s time to start experimenting a bit
2. A local lab with Vagrant
2.1. Basic configuration review
It’s very easy to have a ephemeral lab of Vault, thanks to the dev server.
But that’s not what we would like to achieve. Instead, we will create a local lab with the help of another HashiCorp tool: Vagrant.
There are many doc and tutorials on this tool, and I honestly found the configuration for this lab somewhere on the Internet. To get started, we need a Vagrantfile file, somehow similar to docker, except it’s all virtual machine. The vagrant file content is like this:
VAULTSERVER_COUNT = 1
IMAGEVAULT = "bento/ubuntu-22.04"

Vagrant.configure("2") do |config|

  (1..VAULTSERVER_COUNT).each do |i|
    config.vm.define "vaultserver#{i}" do |vaultservers|
      vaultservers.vm.box = IMAGEVAULT
      vaultservers.vm.hostname = "vaultserver#{i}"
      vaultservers.vm.network  :private_network, ip: "192.168.56.#{i+10}"
      vaultservers.vm.provision "file", source: "./config/vaultconfig.hcl", destination: "/tmp/config.hcl"
      vaultservers.vm.provision "shell", privileged: true,  path: "scripts/vault_install.sh"
    end
  end
end
We are using the vagrant box bento/ubuntu-22.04 which, as its name implies, gives us an ubuntu in our virtual machine.
We can note also the IP configuration with the line vaultservers.vm.network :private_network, ip: "192.168.56.#{i+10}", which match the network range of our virtual box configuration.
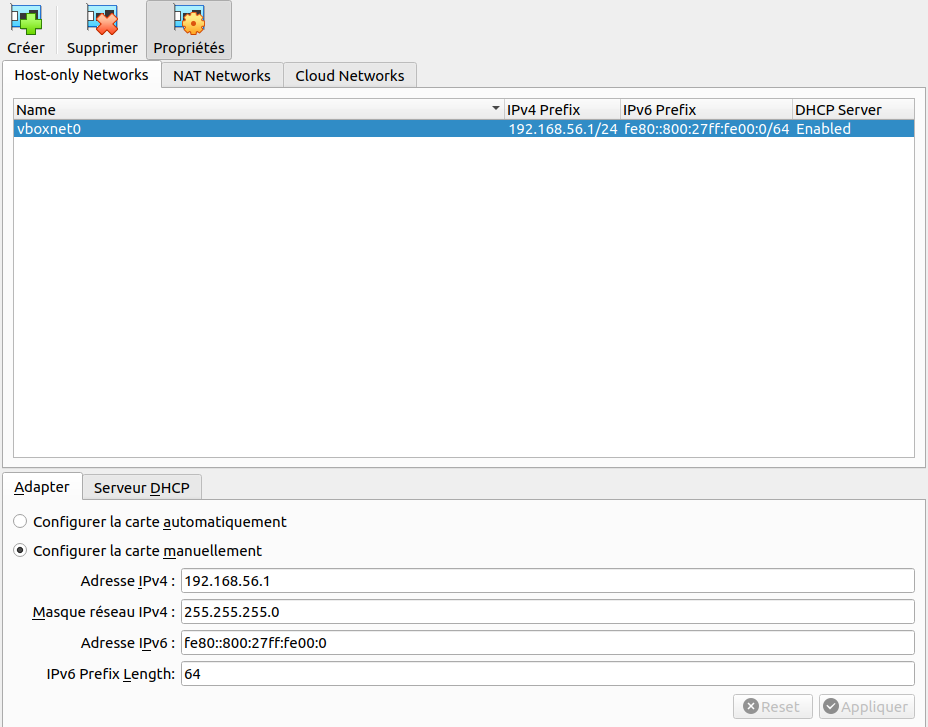
Next, we copy a vaultconfig.hcl file to the vagrant box, before using a vault_install.sh script
storage "raft" {
  path    = "/opt/vault/data"
  node_id = "node1"
}

listener "tcp" {
  address     = "0.0.0.0:8200"
  tls_disable = "true"
}

api_addr = "http://0.0.0.0:8200"
cluster_addr = "https://serverip:8201"
ui = true
#!/bin/sh

echo "127.0.1.1 $(hostname)" >> /etc/hosts

# Get current IP adress

export currentip=$(/sbin/ip -o -4 addr list enp0s8 | awk '{print $4}' | cut -d/ -f1)

# Add HashiCorp repository

wget -O- https://apt.releases.hashicorp.com/gpg | sudo gpg --dearmor -o /usr/share/keyrings/hashicorp-archive-keyring.gpg
echo "deb [signed-by=/usr/share/keyrings/hashicorp-archive-keyring.gpg] https://apt.releases.hashicorp.com $(lsb_release -cs) main" | sudo tee /etc/apt/sources.list.d/hashicorp.list

# Install vault

sudo apt update
sudo apt install vault net-tools apt-transport-https gnupg curl wget bat -y

# Set up UFW

sudo ufw allow OpenSSH
sudo ufw allow https

for i in 8200/tcp 8201/tcp 8250/tcp 443/tcp
do sudo ufw allow $i
done

#sudo ufw enable -y

# prepare vault configuration

sed -i 's/serverip/'$currentip'/g' /tmp/config.hcl
mv /tmp/config.hcl /etc/vault.d/config.hcl

# Create user without login for vault service
sudo adduser vault --shell=/bin/false --no-create-home --disabled-password --gecos GECOS

# granting access to vault user
chmod 700 -R /opt/vault
chown vault -R /opt/vault
Initiating the creation of our virtual box vm with the vagrant up command, we should have an output looking like this:
yumemaru@df2204lts:~/vaultlab/vault_standalone_vagrant$ vagrant up
Bringing machine 'vaultserver1' up with 'virtualbox' provider...
==> vaultserver1: Importing base box 'bento/ubuntu-22.04'...
==> vaultserver1: Matching MAC address for NAT networking...
==> vaultserver1: Checking if box 'bento/ubuntu-22.04' version '202309.08.0' is up to date...
==> vaultserver1: Setting the name of the VM: vault_standalone_vagrant_vaultserver1_1731619580815_26084
==> vaultserver1: Clearing any previously set network interfaces...
==> vaultserver1: Preparing network interfaces based on configuration...
    vaultserver1: Adapter 1: nat
    vaultserver1: Adapter 2: hostonly
==> vaultserver1: Forwarding ports...
    vaultserver1: 22 (guest) => 2222 (host) (adapter 1)
==> vaultserver1: Booting VM...
========================truncated========================
    vaultserver1: No VM guests are running outdated hypervisor (qemu) binaries on this host.
    vaultserver1: Rules updated
    vaultserver1: Rules updated (v6)
    vaultserver1: Rules updated
    vaultserver1: Rules updated (v6)
    vaultserver1: Rules updated
    vaultserver1: Rules updated (v6)
    vaultserver1: Rules updated
    vaultserver1: Rules updated (v6)
    vaultserver1: Rules updated
    vaultserver1: Rules updated (v6)
    vaultserver1: Rules updated
    vaultserver1: Rules updated (v6)
    vaultserver1: adduser: The user `vault' already exists.
We should be able to access the box with a vagrant ssh command now and get access to our playground:
yumemaru@df2204lts:~$ vagrant ssh
Welcome to Ubuntu 22.04.3 LTS (GNU/Linux 5.15.0-83-generic x86_64)

 * Documentation:  https://help.ubuntu.com
 * Management:     https://landscape.canonical.com
 * Support:        https://ubuntu.com/advantage

  System information as of Thu Nov 14 09:30:21 PM UTC 2024

  System load:  0.02978515625      Processes:             157
  Usage of /:   13.9% of 30.34GB   Users logged in:       0
  Memory usage: 13%                IPv4 address for eth0: 10.0.2.15
  Swap usage:   0%                 IPv4 address for eth1: 192.168.56.11


This system is built by the Bento project by Chef Software
More information can be found at https://github.com/chef/bento
We should find the vault config file in the /etc/vault.d/config.hcl file
vagrant@vaultserver1:~$ batcat /etc/vault.d/config.hcl
───────┬───────────────────────────────────────────────────────────────────────────────────────────────────────────────────────────────────
       │ File: /etc/vault.d/config.hcl
───────┼───────────────────────────────────────────────────────────────────────────────────────────────────────────────────────────────────
   1   │ storage "raft" {
   2   │   path    = "/opt/vault/data"
   3   │   node_id = "node1"
   4   │ }
   5   │
   6   │ listener "tcp" {
   7   │   address     = "0.0.0.0:8200"
   8   │   tls_disable = "true"
   9   │ }
  10   │
  11   │ api_addr = "http://0.0.0.0:8200"
  12   │ cluster_addr = "https://192.168.56.11:8201"
  13   │ ui = true
───────┴───────────────────────────────────────────────────────────────────────────────────────────────────────────────────────────────────
vagrant@vaultserver1:~$
We want to start our vault server based on this config so we will use the vault server command:
vagrant@vaultserver1:~$ vault server -config /etc/vault.d/config.hcl
Error initializing storage of type raft: failed to create fsm: failed to open bolt file: error checking raft FSM db file "/opt/vault/data/vault.db": stat /opt/vault/data/vault.db: permission denied
2024-11-14T21:34:51.595Z [INFO]  proxy environment: http_proxy="" https_proxy="" no_proxy=""
And it does not work!
But it makes sense, there is no reason that we should access the path /opt/vault/data with the vagrant user.
Let’s just verify tha the configuration is ok, by launching the vault command with sudo.
vagrant@vaultserver1:~$ sudo vault server -config /etc/vault.d/config.hcl &
[1] 3737
vagrant@vaultserver1:~$ ==> Vault server configuration:

Administrative Namespace:
             Api Address: http://0.0.0.0:8200
                     Cgo: disabled
         Cluster Address: https://192.168.56.11:8201
   Environment Variables: HOME, LANG, LOGNAME, LS_COLORS, MAIL, PATH, SHELL, SUDO_COMMAND, SUDO_GID, SUDO_UID, SUDO_USER, TERM, USER
              Go Version: go1.22.8
              Listener 1: tcp (addr: "0.0.0.0:8200", cluster address: "0.0.0.0:8201", disable_request_limiter: "false", max_request_duration: "1m30s", max_request_size: "33554432", tls: "disabled")
               Log Level:
                   Mlock: supported: true, enabled: true
           Recovery Mode: false
                 Storage: raft (HA available)
                 Version: Vault v1.18.1, built 2024-10-29T14:21:31Z
             Version Sha: f479e5c85462477c9334564bc8f69531cdb03b65

==> Vault server started! Log data will stream in below:

2024-11-14T21:42:28.438Z [INFO]  proxy environment: http_proxy="" https_proxy="" no_proxy=""
2024-11-14T21:42:28.442Z [INFO]  incrementing seal generation: generation=1
2024-11-14T21:42:28.489Z [INFO]  core: Initializing version history cache for core
2024-11-14T21:42:28.489Z [INFO]  events: Starting event system
Checking the status of vault with the vault status command, we get a proper answer after setting the VAULT_ADDR environment variable:
vagrant@vaultserver1:~$ vault status
WARNING! VAULT_ADDR and -address unset. Defaulting to https://127.0.0.1:8200.
Error checking seal status: Get "https://127.0.0.1:8200/v1/sys/seal-status": http: server gave HTTP response to HTTPS client
vagrant@vaultserver1:~$ export VAULT_ADDR="http://192.168.56.11:8200"
vagrant@vaultserver1:~$ vault status
2024-11-14T21:43:17.341Z [INFO]  core: security barrier not initialized
2024-11-14T21:43:17.341Z [INFO]  core: seal configuration missing, not initialized
Key                Value
---                -----
Seal Type          shamir
Initialized        false
Sealed             true
Total Shares       0
Threshold          0
Unseal Progress    0/0
Unseal Nonce       n/a
Version            1.18.1
Build Date         2024-10-29T14:21:31Z
Storage Type       raft
HA Enabled         true
So it works this time, but it’s not “reboot persistent”, and well, it’s really not a good idea to start apps as root so let’s try to do better.
vagrant@vaultserver1:~$ export VAULT_ADDR="http://192.168.56.11:8200"
vagrant@vaultserver1:~$ vault status
Error checking seal status: Get "http://192.168.56.11:8200/v1/sys/seal-status": dial tcp 192.168.56.11:8200: connect: connection refused
2.2. Configuring Vault as a service
This time, we will add a configuration in the vault_install.sh so that Vault is configured as a service.
For this, we can find what we need on the vault documentation.
In our case, we will add the following in our script:
sudo tee -a /etc/systemd/system/vault.service > /dev/null <<EOT
[Unit]
Description="HashiCorp Vault"
Documentation="https://developer.hashicorp.com/vault/docs"
Requires=network-online.target
After=network-online.target
ConditionFileNotEmpty=/etc/vault.d/config.hcl
[Service]
User=vault
Group=vault
ProtectSystem=full
ProtectHome=read-only
PrivateTmp=yes
PrivateDevices=yes
SecureBits=keep-caps
AmbientCapabilities=CAP_IPC_LOCK
Capabilities=CAP_IPC_LOCK+ep
CapabilityBoundingSet=CAP_SYSLOG CAP_IPC_LOCK
NoNewPrivileges=yes
ExecStart=/usr/bin/vault server -config=/etc/vault.d/config.hcl
ExecReload=/bin/kill --signal HUP $MAINPID
KillMode=process
KillSignal=SIGINT
Restart=on-failure
RestartSec=5
TimeoutStopSec=30
StartLimitInterval=60
StartLimitBurst=3
LimitNOFILE=65536
LimitMEMLOCK=infinity

[Install]
WantedBy=multi-user.target
EOT
# Enable and start the service
sudo systemctl daemon-reload
sudo systemctl start vault.service
sudo systemctl enable vault.service
To avoid using the root account, we specified a vault user earlier with some authorization:
# granting access to vault user
chmod 700 -R /opt/vault
chown vault -R /opt/vault
After rebuilding our box, we have a working vault service:
vagrant@vaultserver1:~$ systemctl status vault
● vault.service - "HashiCorp Vault"
     Loaded: loaded (/etc/systemd/system/vault.service; enabled; vendor preset: enabled)
     Active: active (running) since Thu 2024-11-14 22:07:24 UTC; 40s ago
       Docs: https://developer.hashicorp.com/vault/docs
   Main PID: 2537 (vault)
      Tasks: 8 (limit: 2219)
     Memory: 134.6M
        CPU: 157ms
     CGroup: /system.slice/vault.service
             └─2537 /usr/bin/vault server -config=/etc/vault.d/config.hcl

Nov 14 22:07:24 vaultserver1 vault[2537]:                    Mlock: supported: true, enabled: true
Nov 14 22:07:24 vaultserver1 vault[2537]:            Recovery Mode: false
Nov 14 22:07:24 vaultserver1 vault[2537]:                  Storage: raft (HA available)
Nov 14 22:07:24 vaultserver1 vault[2537]:                  Version: Vault v1.18.1, built 2024-10-29T14:21:31Z
Nov 14 22:07:24 vaultserver1 vault[2537]:              Version Sha: f479e5c85462477c9334564bc8f69531cdb03b65
Nov 14 22:07:24 vaultserver1 vault[2537]: ==> Vault server started! Log data will stream in below:
Nov 14 22:07:24 vaultserver1 vault[2537]: 2024-11-14T22:07:24.836Z [INFO]  proxy environment: http_proxy="" https_proxy="" no_proxy=""
Nov 14 22:07:24 vaultserver1 vault[2537]: 2024-11-14T22:07:24.859Z [INFO]  incrementing seal generation: generation=1
Nov 14 22:07:24 vaultserver1 vault[2537]: 2024-11-14T22:07:24.922Z [INFO]  core: Initializing version history cache for core
Nov 14 22:07:24 vaultserver1 vault[2537]: 2024-11-14T22:07:24.922Z [INFO]  events: Starting event system
yumemaru@df2204lts:~$ vault status
Key                Value
---                -----
Seal Type          shamir
Initialized        false
Sealed             true
Total Shares       0
Threshold          0
Unseal Progress    0/0
Unseal Nonce       n/a
Version            1.18.1
Build Date         2024-10-29T14:21:31Z
Storage Type       raft
HA Enabled         true
Ok, the playground is ready, let’s begin the serious stuff now ^^
3. Basics with Vault
3.1. Unsealing vault
Now that we have a vault server ready, we need to interact with it.
At this point, the server is neither initiated nor unsealed, as we saw on the previous section, so first, we will need to initialize it.
This is something we can achieve with the vault operator init command, which documentation is available here.
By default the seal type is shamir. For those who wonders what hide behind this name, there’s a definition available on wikipedia.
Remember, we said earlier that the unseal operation is how we get the root key that protect the encryption key. Once we have it, we can encrypt/decrypt data to the backend storage, if we don’t have it, we cannot read/write on the storage, hence the Vault server is sealed.
To summarize, shamir is a secret sharing algorithm, which relies on a quorum. The secret information is divided into parts that need to be assembled in a sufficiant number to rebuild the secrets.
In our case, when we initialize the vault server with shamir seal, we will thus specify the number of shares with the argument -key-shares, and the number of share required to rebuild the root token with the argument -key-threshold.
yumemaru@df2204lts:~/$ vault operator init --key-shares=3 --key-threshold=2
Unseal Key 1: pUFxxxxxxxxxxxxxxxxxxxxxxxxxxxxxxxxxxxxxxxxx
Unseal Key 2: E53xxxxxxxxxxxxxxxxxxxxxxxxxxxxxxxxxxxxxxxxx
Unseal Key 3: Z9Gxxxxxxxxxxxxxxxxxxxxxxxxxxxxxxxxxxxxxxxxx

Initial Root Token: hvs.xxxxxxxxxxxxxxxxxxxxxxxx

Vault initialized with 3 key shares and a key threshold of 2. Please securely
distribute the key shares printed above. When the Vault is re-sealed,
restarted, or stopped, you must supply at least 2 of these keys to unseal it
before it can start servicing requests.

Vault does not store the generated root key. Without at least 2 keys to
reconstruct the root key, Vault will remain permanently sealed!

It is possible to generate new unseal keys, provided you have a quorum of
existing unseal keys shares. See "vault operator rekey" for more information.
And now our vault server is initialized, but still sealed:
yumemaru@df2204lts:~$ vault status
Key                Value
---                -----
Seal Type          shamir
Initialized        true
Sealed             true
Total Shares       3
Threshold          2
Unseal Progress    0/2
Unseal Nonce       n/a
Version            1.18.1
Build Date         2024-10-29T14:21:31Z
Storage Type       raft
HA Enabled         true
So let’s unseal it, wit the command vault operator unseal.
yumemaru@df2204lts:~$ vault operator unseal
Unseal Key (will be hidden):
Key                Value
---                -----
Seal Type          shamir
Initialized        true
Sealed             true
Total Shares       3
Threshold          2
Unseal Progress    1/2
Unseal Nonce       79d66d27-5940-4efd-f400-333df3e94bb5
Version            1.18.1
Build Date         2024-10-29T14:21:31Z
Storage Type       raft
HA Enabled         true
yumemaru@df2204lts:~$ vault operator unseal
Unseal Key (will be hidden):
Key                     Value
---                     -----
Seal Type               shamir
Initialized             true
Sealed                  false
Total Shares            3
Threshold               2
Version                 1.18.1
Build Date              2024-10-29T14:21:31Z
Storage Type            raft
Cluster Name            vault-cluster-119c65b3
Cluster ID              3132df7a-4db9-1a55-a6fd-ac0597fef2dd
HA Enabled              true
HA Cluster              n/a
HA Mode                 standby
Active Node Address     <none>
Raft Committed Index    33
Raft Applied Index      33
yumemaru@df2204lts:~$ vault status
Key                     Value
---                     -----
Seal Type               shamir
Initialized             true
Sealed                  false
Total Shares            3
Threshold               2
Version                 1.18.1
Build Date              2024-10-29T14:21:31Z
Storage Type            raft
Cluster Name            vault-cluster-119c65b3
Cluster ID              3132df7a-4db9-1a55-a6fd-ac0597fef2dd
HA Enabled              true
HA Cluster              https://192.168.56.11:8201
HA Mode                 active
Active Since            2024-11-20T08:25:19.970275105Z
Raft Committed Index    58
Raft Applied Index      58
We can log on the Vault server, with the cli:
yumemaru@df2204lts:~$ vault login
Token (will be hidden):
Success! You are now authenticated. The token information displayed below
is already stored in the token helper. You do NOT need to run "vault login"
again. Future Vault requests will automatically use this token.

Key                  Value
---                  -----
token                hvs.xxxxxxxxxxxxxxxxxxxxxxxx
token_accessor       xxxxxxxxxxxxxxxxxxxxxx
token_duration       ∞
token_renewable      false
token_policies       ["root"]
identity_policies    []
policies             ["root"]
Or use the UI.
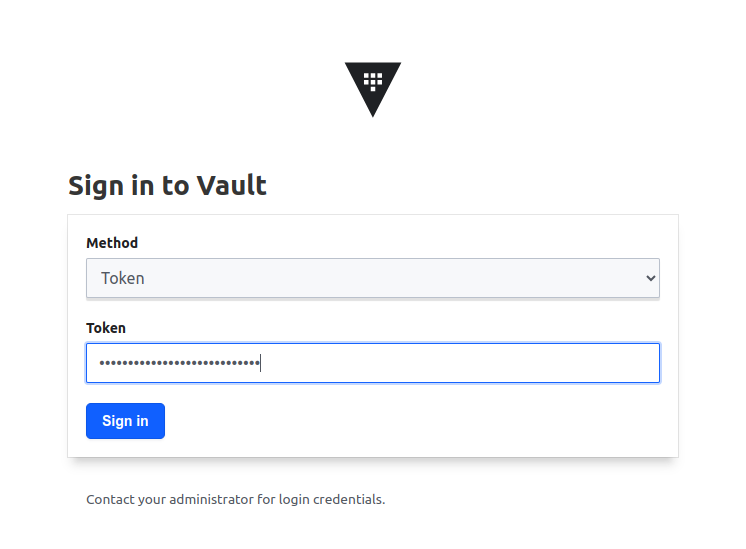
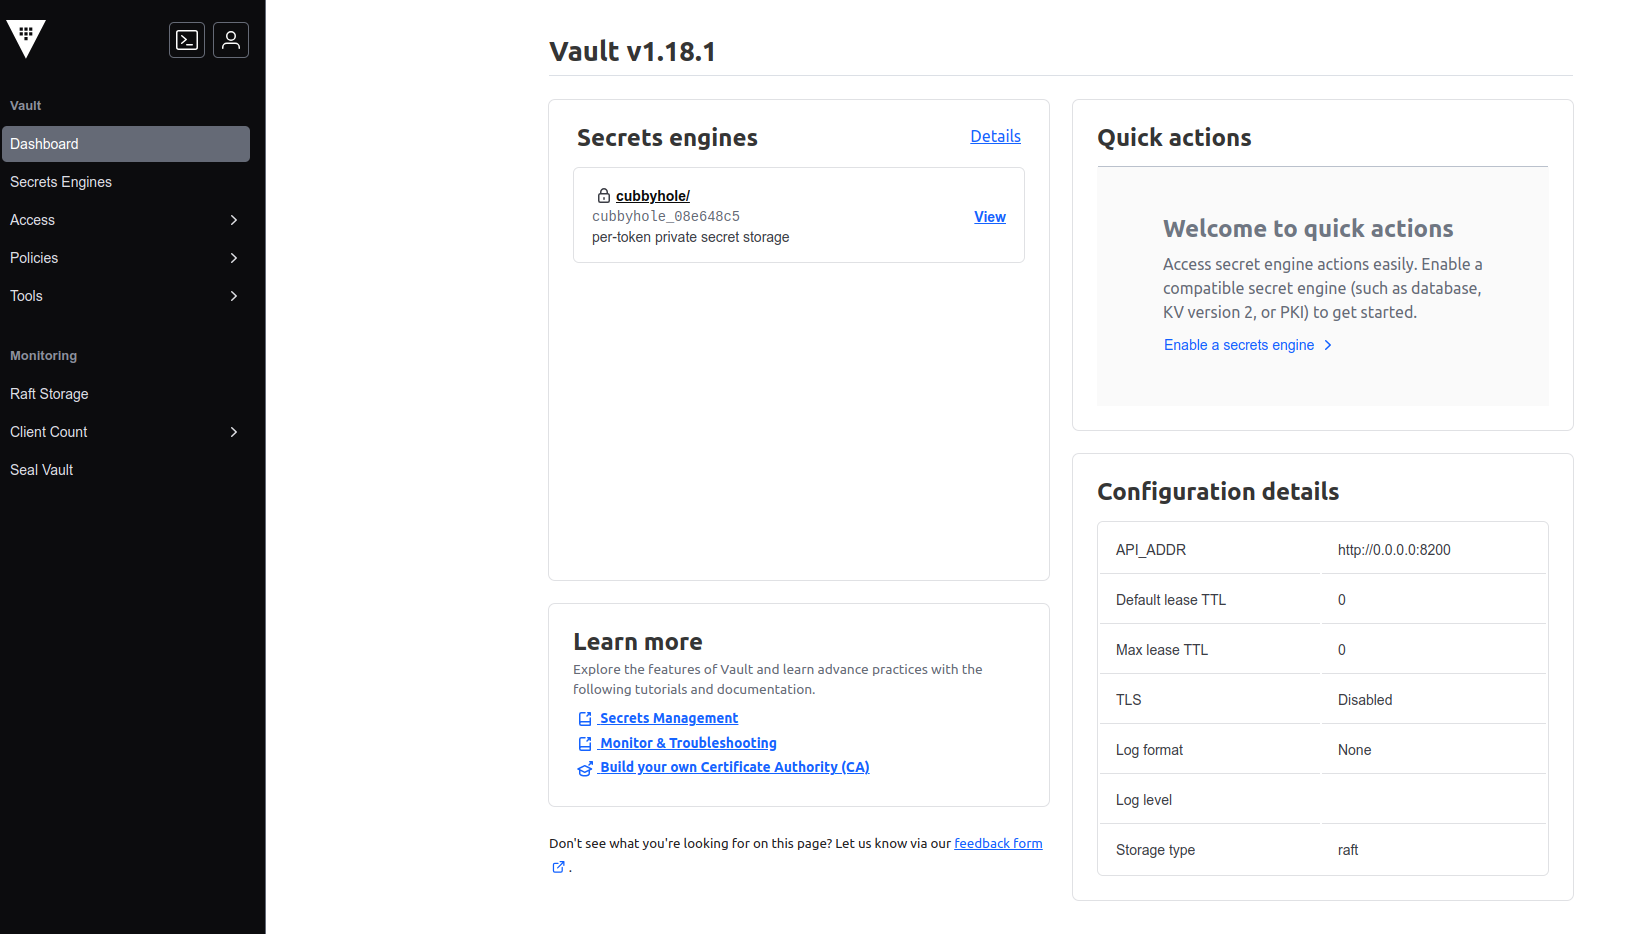
We can see that we inherit the root policy with the root token. This is a built in policy, and it’s not possible to delete it. As a matter of fact, when we list the policies at this point, we get only 2 results, the root and the default.
yumemaru@df2204lts:~$ vault policy list
default
root
But if we try to get details on the root policy, we get this peculiar message:
yumemaru@df2204lts:~$ vault policy read root
No policy named: root
On the UI, we can see the policy but it’s specified that there is no rule in it, while at the same time granting full access.
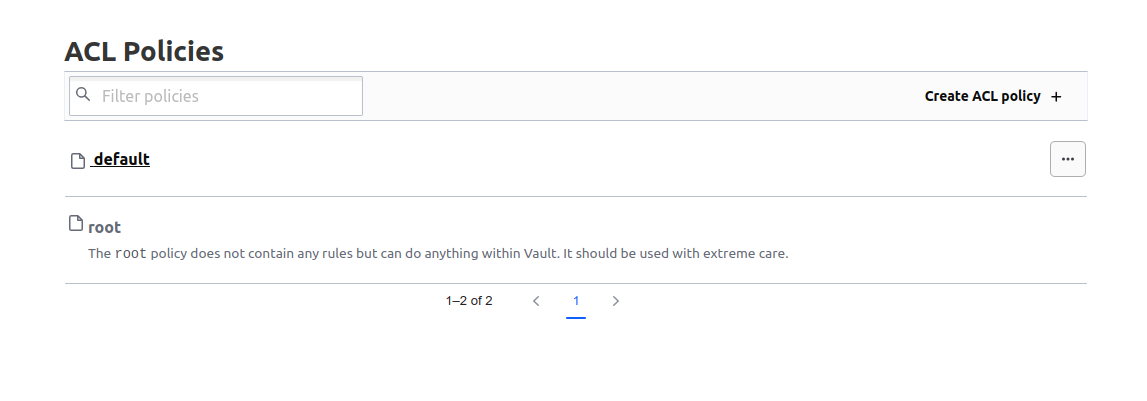
Ok, that’s nice for a first contact. But what happens if I need to rotate the root token?
3.2. Change the root token
Again, we will rely on a command in the vault operator area. Specifically, this time we will use the subcommand generate-root.
It’s a multi-steps operations:
- Generate an OTP with the
-initargument
yumemaru@df2204lts:~$ vault operator generate-root -init
A One-Time-Password has been generated for you and is shown in the OTP field.
You will need this value to decode the resulting root token, so keep it safe.
Nonce         32f50c78-207d-fe24-d3a2-c2f3bb26ee53
Started       true
Progress      0/2
Complete      false
OTP           D1Poxxxxxxxxxxxxxxxxxxxxxxxx
OTP Length    28
- Generate the new root token with the appropriate key shares, in our case 2.
yumemaru@df2204lts:~$ vault operator generate-root
Operation nonce: 32f50c78-207d-fe24-d3a2-c2f3bb26ee53
Unseal Key (will be hidden):
Nonce       32f50c78-207d-fe24-d3a2-c2f3bb26ee53
Started     true
Progress    1/2
Complete    false
yumemaru@df2204lts:~$ vault operator generate-root
Operation nonce: 32f50c78-207d-fe24-d3a2-c2f3bb26ee53
Unseal Key (will be hidden):
Nonce            32f50c78-207d-fe24-d3a2-c2f3bb26ee53
Started          true
Progress         2/2
Complete         true
Encoded Token    LEcjxxxxxxxxxxxxxxxxxxxxxxxxxxxxxxxxxxx
- Decode the result token and store it away ^^
yumemaru@df2204lts:~$ vault operator generate-root -decode LEcjxxxxxxxxxxxxxxxxxxxxxxxxxxxxxxxxxxx -otp D1Poxxxxxxxxxxxxxxxxxxxxxxxx
hvs.xxxxxxxxxxxxxxxxxxxxxxxx
So we know how to init, unseal Vault and reset the root token. And the server seals itself upon restart, unless…
3.3. Vault auto unseal with keyvault
Vault can be configured to use a feature to auto-unseal upon startup. In this case, instead of requiring Vault operators to enter the unseal keys, Vault will fetch a key store, for example a keyvault, to get the encryption key.
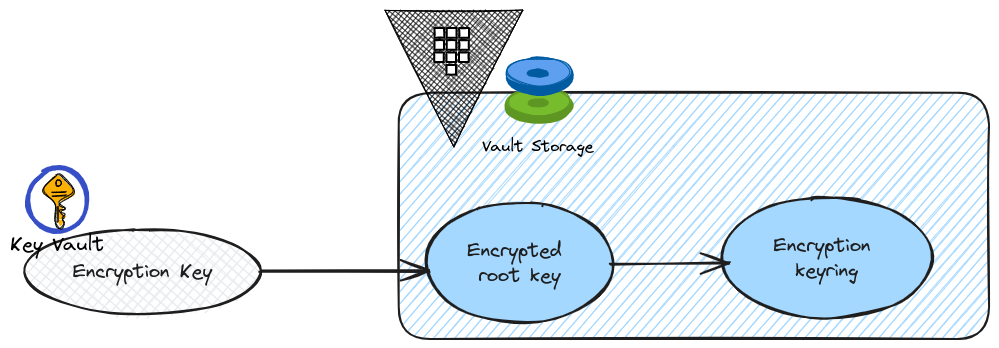
From a configuration point of view, it means that Vault needs access to the key store. Taking the Azure Keyvault example, it means a security principals with access to the keyvault and specifically to the encryption key in it. We can achieve that with an application registration to which we grant authorization on the keyvault, either through rbac or access policies.
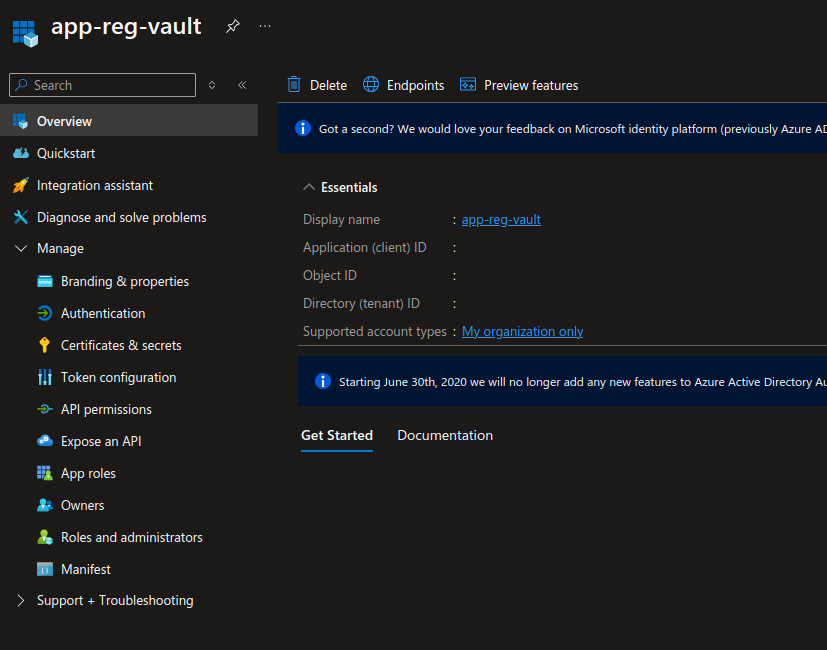
yumemaru@df2204lts:~$ az keyvault show -n kvnysvsi -g rg-kv | jq .properties.accessPolicies[2]
{
  "applicationId": null,
  "objectId": "00000000-0000-0000-000000000000",
  "permissions": {
    "certificates": [
      "get",
      "list",
      "getissuers",
      "listissuers"
    ],
    "keys": [
      "get",
      "list",
      "wrapkey",
      "unwrapkey"
    ],
    "secrets": [
      "get",
      "list"
    ],
    "storage": null
  },
  "tenantId": "00000000-0000-0000-000000000000"
}
Once we have those prerequisites, we need to add some parameters in the Vault configuration file
storage "raft" {
  path    = "/opt/vault/data"
  node_id = "node1"
}

listener "tcp" {
  address     = "0.0.0.0:8200"
  tls_disable = "true"
}

api_addr = "http://0.0.0.0:8200"
cluster_addr = "https://192.168.56.11:8201"
ui = true

seal "azurekeyvault" {
  tenant_id      = "00000000-0000-0000-0000-000000000000"
  client_id      = "00000000-0000-0000-0000-000000000000"
  client_secret  = "xxxxxxxxxxxxxxxxxxxxxxxxxxxxxxxxxxxxxxxx"
  vault_name     = "<keyvault_name>"
  key_name       = "keyvault_key_name"
}
At this point, even if we restart the server, the autounseal is not complete. We need to migrate.
Vault is still sealed.
vagrant@vaultserver1:~$ sudo systemctl status vault
● vault.service - "Hashicorp Vault"
     Loaded: loaded (/etc/systemd/system/vault.service; enabled; vendor preset: enabled)
     Active: active (running) since Fri 2025-01-03 17:07:38 UTC; 7s ago
       Docs: https://developer.hashicorp.com/vault/docs
   Main PID: 2372 (vault)
      Tasks: 7 (limit: 2275)
     Memory: 102.3M
        CPU: 174ms
     CGroup: /system.slice/vault.service
             └─2372 /usr/bin/vault server -config=/etc/vault.d/config.hcl

Jan 03 17:07:38 vaultserver1 vault[2372]:            Recovery Mode: false
Jan 03 17:07:38 vaultserver1 vault[2372]:                  Storage: raft (HA available)
Jan 03 17:07:38 vaultserver1 vault[2372]:                  Version: Vault v1.18.3, built 2024-12-16T14:00:53Z
Jan 03 17:07:38 vaultserver1 vault[2372]:              Version Sha: 7ae4eca5403bf574f142cd8f987b8d83bafcd1de
Jan 03 17:07:38 vaultserver1 vault[2372]: ==> Vault server started! Log data will stream in below:
Jan 03 17:07:38 vaultserver1 vault[2372]: 2025-01-03T17:07:38.287Z [INFO]  proxy environment: http_proxy="" https_proxy="" no_proxy=""
Jan 03 17:07:38 vaultserver1 vault[2372]: 2025-01-03T17:07:38.868Z [INFO]  incrementing seal generation: generation=1
Jan 03 17:07:38 vaultserver1 vault[2372]: 2025-01-03T17:07:38.919Z [WARN]  core: entering seal migration mode; Vault will not automatically unseal even if using an autoseal: from_barrier_typ>
Jan 03 17:07:38 vaultserver1 vault[2372]: 2025-01-03T17:07:38.919Z [INFO]  core: Initializing version history cache for core
Jan 03 17:07:38 vaultserver1 vault[2372]: 2025-01-03T17:07:38.919Z [INFO]  events: Starting event system

vagrant@vaultserver1:~$ vault status
Key                           Value
---                           -----
Seal Type                     azurekeyvault
Recovery Seal Type            shamir
Initialized                   true
Sealed                        true
Total Recovery Shares         3
Threshold                     2
Unseal Progress               0/2
Unseal Nonce                  n/a
Seal Migration in Progress    true
Version                       1.18.3
Build Date                    2024-12-16T14:00:53Z
Storage Type                  raft
HA Enabled                    true
And we cannot unseal, because the auto unseal migration is initiated.
yumemaru@df2204lts:~/Documents/myrepo/vaultlab/vault_standalone_vagrant$ vault operator unseal
Unseal Key (will be hidden):
Error unsealing: Error making API request.

URL: PUT http://192.168.56.11:8200/v1/sys/unseal
Code: 500. Errors:

* migrate option not provided and seal migration is pending
The last step can be performed with the vault operator unseal -migrate.
We need to provide the required number of unseal key to complete the migration.
yumemaru@df2204lts:~$ vault operator unseal -migrate
Unseal Key (will be hidden):
Key                           Value
---                           -----
Seal Type                     azurekeyvault
Recovery Seal Type            shamir
Initialized                   true
Sealed                        true
Total Recovery Shares         3
Threshold                     2
Unseal Progress               1/2
Unseal Nonce                  dc01ccea-6eb4-f8be-f72d-dd58e319bac2
Seal Migration in Progress    true
Version                       1.18.1
Build Date                    2024-10-29T14:21:31Z
Storage Type                  raft
HA Enabled                    true
yumemaru@df2204lts:~$ vault operator unseal -migrate
Unseal Key (will be hidden):
Key                           Value
---                           -----
Seal Type                     azurekeyvault
Recovery Seal Type            shamir
Initialized                   true
Sealed                        false
Total Recovery Shares         3
Threshold                     2
Seal Migration in Progress    true
Version                       1.18.1
Build Date                    2024-10-29T14:21:31Z
Storage Type                  raft
Cluster Name                  vault-cluster-119c65b3
Cluster ID                    3132df7a-4db9-1a55-a6fd-ac0597fef2dd
HA Enabled                    true
HA Cluster                    n/a
HA Mode                       standby
Active Node Address           <none>
Raft Committed Index          518
Raft Applied Index            518
yumemaru@df2204lts:~$ vault status
Key                      Value
---                      -----
Seal Type                azurekeyvault
Recovery Seal Type       shamir
Initialized              true
Sealed                   false
Total Recovery Shares    3
Threshold                2
Version                  1.18.1
Build Date               2024-10-29T14:21:31Z
Storage Type             raft
Cluster Name             vault-cluster-119c65b3
Cluster ID               3132df7a-4db9-1a55-a6fd-ac0597fef2dd
HA Enabled               true
HA Cluster               https://192.168.56.11:8201
HA Mode                  active
Active Since             2024-11-20T20:20:52.006568826Z
Raft Committed Index     581
Raft Applied Index       581
After a reboot (remember, we are in vagrant, so let’s vagrant reload), Vault is automatically unsealed
yumemaru@df2204lts:~$ vault status
Key                      Value
---                      -----
Seal Type                azurekeyvault
Recovery Seal Type       shamir
Initialized              true
Sealed                   false
Total Recovery Shares    3
Threshold                2
Version                  1.18.1
Build Date               2024-10-29T14:21:31Z
Storage Type             raft
Cluster Name             vault-cluster-119c65b3
Cluster ID               3132df7a-4db9-1a55-a6fd-ac0597fef2dd
HA Enabled               true
HA Cluster               https://192.168.56.11:8201
HA Mode                  active
Active Since             2024-11-20T20:22:06.267455725Z
Raft Committed Index     611
Raft Applied Index       611
4. Summary
In this article, we just scratched the surface of Vault. But at least, we know how to initiate Vault, configure auto unseal, and also how to rotate the root token. There’s much more to see. But this was more than enough for a first one so we’ll stop here.